不少程序员都抱怨 Python/ target=_blank class=infotextkey>Python 代码跑的慢,尤其是当处理的数据集比较大的时候。对此,本文作者指出:只需不到 100 行 Rust 代码就能解决这个问题。
原文链接:https://ohadravid.Github.io/posts/2023-03-rusty-python/
作者| Ohad Ravid
译者 | 弯月 责编 | 郑丽媛
出品 | CSDN(ID:CSDNnews)
最近,我们的一个核心 Python 库遇到了性能问题。这是一个非常庞大且复杂的库,是我们 3D 处理管道的支柱,使用了 NumPy 以及其他 Python 数据科学库来执行各种数学和几何运算。
具体来说,我们的系统必须在 CPU 资源有限的情况下在本地运行,虽然起初的性能还不错,但随着并发用户数量的增长,我们开始遇到问题,系统也出现了超负载。
我们得出的结论是:系统至少需要再快 50 倍才能处理这些增加的工作负载——而我们认为,Rust 可以帮助我们实现这一目标。
因为我们遇到的性能问题很常见,所以 下面,我来简单介绍一下解决过程:
(a)基本的潜在问题;
(b)我们可以通过哪些优化来解决这个问题。

我们的运行示例
首先,我们通过一个小型库来展示最初的性能问题。
假设有一个多边形列表和一个点列表,且都是二维的,出于业务需求,我们需要将每个点“匹配”到一个多边形。
我们的库需要完成下列任务:
▶ 从点和多边形的初始列表(全部为 2D)着手。
▶ 对于每个点,根据与中心的距离,找到离点最近的多边形的子集。
▶ 从这些多边形中,选择一个“最佳”多边形。
代码大致如下:
fromtyping importList, Tuple importnumpy asnp fromdataclasses importdataclass fromfunctools importcached_property Point = np.array @dataclass classPolygon: x: np.array y: np.array @cached_property defcenter(self)-> Point: ... defarea(self)-> float: ... deffind_close_polygons(polygon_subset: List[Polygon], point: Point, max_dist: float)-> List[Polygon]: ... defselect_best_polygon(polygon_sets: List[Tuple[Point, List[Polygon]]])-> List[Tuple[Point, Polygon]]: ... defmAIn(polygons: List[Polygon], points: np.ndarray)-> List[Tuple[Point, Polygon]]: ...性能方面最主要的难点在于,Python 对象和 numpy 数组的混合。
下面,我们简单地分析一下这个问题。
需要注意的是,对于上面这段代码,我们当然可以把一切都转化成 numpy 的向量计算,但真正的库不可能这么做,因为这会导致代码的可读性和可修改性大大降低,收益也非常有限。此外,使用任何基于JIT 的技巧(PyPy / numba)产生的收益都非常小。
为什么不直接使用 Rust 重写所有代码?
虽然重写所有代码很诱人,但有一些问题:
▶ 该库的大量计算使用了 numpy,Rust 也不一定能提高性能。
▶ 该库庞大而复杂,关系到核心业务逻辑,而且高度算法化,因此重写所有代码需要付出几个月的努力,而我们可怜的本地服务器眼看就要挂了。
▶ 一群好心的研究人员积极努力改进这个库,实现了更好的算法,并进行了大量实验。他们不太愿意学习一门新的编程语言,而且还要等待编译,还要研究复杂的借用检查器——他们不希望离开舒适区太远。
小心探索
下面,我来介绍一下我们的分析器。
Python 有一个内置的 Profiler (cProfile),但对于我们来说,选择这个工具不太合适:
▶它会为所有 Python 代码引入大量开销,却不会给原生代码带来额外开销,因此测试结果可能有偏差。
▶我们将无法查看原生代码的调用帧,这意味着我们也无法查看 Rust 代码。
所以,我们计划使用 py-spy,它是一个采样分析器,可以查看原生帧。他们还将预构建的轮子发布到了 pypi,因此我们只需运行 pip install py-spy 即可。
此外,我们还需要一些测量指标。
# measure.py import time import poly_match import os# Reduce noise, actually improve perf in our case.os.environ[ "OPENBLAS_NUM_THREADS"] = "1"polygons, points = poly_match.generate_example# We are going to increase this as the code gets faster and faster.NUM_ITER = 10t0 = time.perf_counterfor _ in range(NUM_ITER):poly_match.main(polygons, points)t1 = time.perf_countertook = (t1 - t0) / NUM_ITERprint(f "Took and avg of {took * 1000:.2f}ms per iteration")
这些测量指标虽然不是很科学,但可以帮助我们优化性能。
“我们很难找到合适的测量基准。但请不要过分强调拥有完美的基准测试设置,尤其是当你优化某个程序时。”
—— Nicholas.NEThercote,《The Rust Performance Book》
运行该脚本,我们就可以获得测量基准:
$ python measure.pyTook an avg of293.41ms per iteration对于原来的库,我们使用了 50 个不同的样本来确保涵盖所有情况。
这个测量结果与实际的系统性能相符,这意味着,我们的工作就是突破这个数字。
我们还可以使用 PyPy 进行测量:
$ conda create-n pypyenv -c conda-forge pypy numpy && conda activatepypyenv $ pypy measure_with_warmup.pyTook an avgof1495.81ms per iteration先测量
首先,我们来找出什么地方如此之慢。
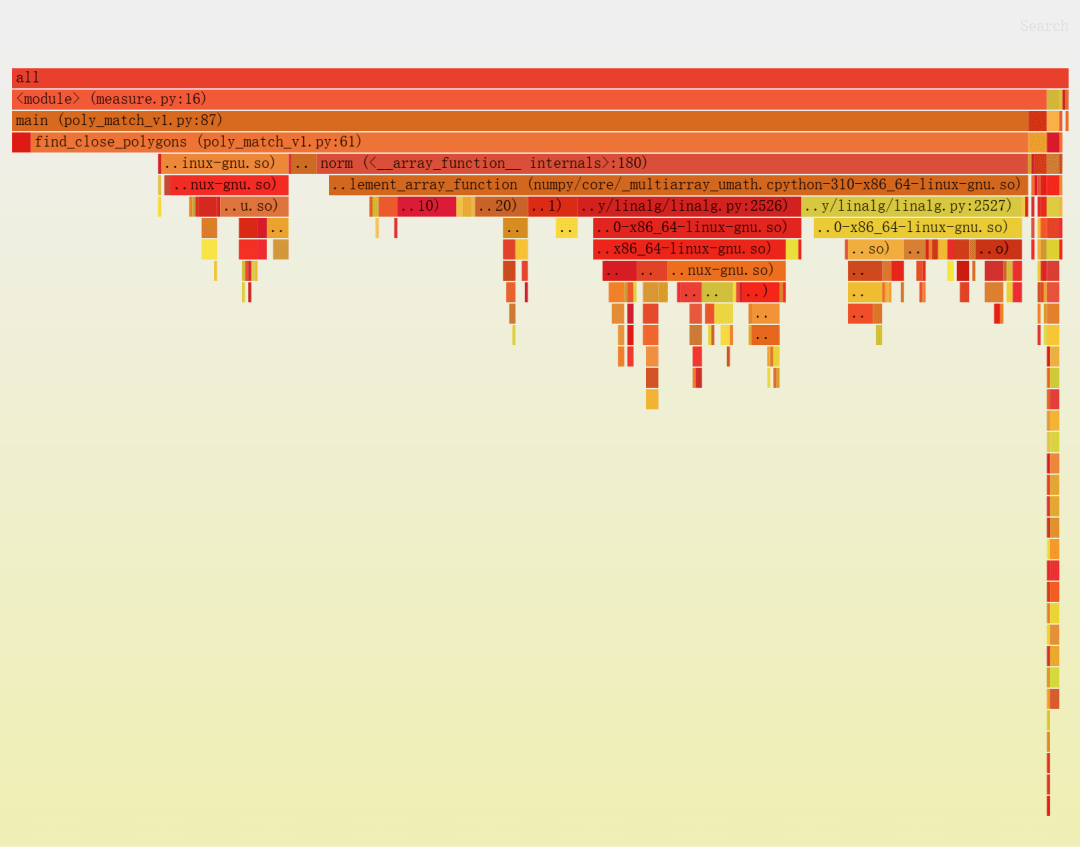
$py-spy record --native -o profile.svg -- python measure.py py-spy>Sampling process 100 timesa second. Press Control-C to exit. Took an avg of 365.43ms per iterationpy-spy>Stopped sampling because process exited py-spy>Wrote flamegraph data to 'profile.svg'. Samples: 391 Errors: 0我们可以看到开销非常小。相较而言,使用 cProfile 得到的数据如下:
$ python -m cProfile measure.pyTook an avg of546.47ms per iteration 7551778functioncalls( 7409483primitive calls ) in7.806 seconds…下面是我们获得的火焰图:

每个方框都是一个函数,我们可以看到每个函数花费的相对时间,包括它正在调用的函数(沿着图形/栈向下)。
要点总结:
▶ 绝大部分时间花在 find_close_polygons 上。
▶ 大部分时间都花在执行 norm,这是一个 numpy 函数。
下面,我们来仔细看看 find_close_polygons:
deffind_close_polygons(polygon_subset: List[Polygon], point: np.array, max_dist: float)-> List[Polygon]: close_polygons = []forpoly inpolygon_subset: ifnp.linalg.norm(poly.center - point) < max_dist: close_polygons.Append(poly)returnclose_polygons我们打算用 Rust 重写这个函数。
在深入细节之前,请务必注意以下几点:
▶ 此函数接受并返回复杂对象(Polygon、np.array)。
▶ 对象的大小非常重要(因此复制需要一定的开销)。
▶ 这个函数被调用了很多次(所以我们引入的开销可能会引发问题)。
我的第一个 Rust 模块
PyO3 是一个用于 Python 和 Rust 之间交互的 crate ,拥有非常好的文档。
我们将调用自己的 poly_match_rs,并添加一个名为 find_close_polygons 的函数。
mkdirpoly_match_rs && cd "$_"pipinstall maturinmaturininit --bindings pyo3maturindevelop刚开始的时候,我们的 crate 大致如下:
use pyo3::prelude::*;#[py function] fnfind_close_polygons( ) -> PyResult<( )> { Ok()}#[pymodule]fn poly_match_rs(_py: Python, m: &PyModule) -> PyResult<> {m.add_function(wrap_py function!( find_close_polygons, m)?)? ; Ok()}我们还需要记住,每次修改 Rust 库时都需要执行 maturin develop。
改动就这么多。下面,我们来调用新函数,看看情况会怎样。
>>> poly_match_rs.find_close_polygons( polygons, point, max_dist) ETypeError: poly_match_rs.poly_match_rs.find_close_polygonstakesnoarguments(3 given)第一版:Rust 转换
首先,我们来定义 API。
PyO3 可以帮助我们将 Python 转换成 Rust:
#[pyfunction]fn find_close_polygons( polygons:Vec<PyObject>, point:PyObject, max_dist:f64) -> PyResult<Vec<PyObject >> { Ok(vec![])}PyObject (顾名思义)是一个通用、“一切皆有可能”的 Python 对象。稍后,我们将尝试与它进行交互。
这样程序应该就可以运行了(尽管不正确)。
我直接把原来的 Python 函数复制粘帖进去,并修复了语法问题。
#[pyfunction]fn find_close_polygons( polygons: Vec<PyObject>, point: PyObject, max_dist: f64) -> PyResult<Vec<PyObject>> { letmut close_polygons = vec![];forpoly inpolygons { ifnorm( poly.center - point) < max_dist { close_polygons.push(poly)}}
Ok(close_polygons)}
可惜未能通过编译:
% maturin develop...error[E0609]: no field `center`on type `Py<PyAny>`--> src/lib. rs:8:22|8 |ifnorm(poly.center - point) < max_dist { | ^^^^^^ unknown fielderror[E0425]: cannot find function `norm` inthis scope --> src/lib.rs:8:12|8| ifnorm(poly.center - point) < max_dist { |^^^^ notfound inthis scope error:aborting due to 2previous errors ] 58/ 59: poly_match_rs我们需要 3 个 crate 才能实现函数:
# For Rust-native array operations.ndarray= "0.15"# For a `norm` function for arrays.ndarray-linalg= "0.16"# For accessing numpy-created objects, based on `ndarray`.numpy= "0.18"首先,我们将 point: PyObject 转换成可以使用的东西。
我们可以利用 PyO3 来转换 numpy 数组:
use numpy::PyReadonlyArray1;#[py function] fnfind_close_polygons( // An object which says "I have the GIL", so we can access Python-managed memory.py: Python<'_>,polygons: Vec<PyObject>,// A reference to a numpy array we will be able to access.point: PyReadonlyArray1<f64>,max_dist: f64,) -> PyResult< Vec< PyObject>> { // Convert to `ndarray::ArrayView1`, a fully operational native array.letpoint = point.as_array; ...}现在 point 变成了 ArrayView1,我们可以直接使用了。例如:
// Make the `norm` function available.usendarray_linalg:: Norm; assert_eq!((point.to_owned - point).norm, 0.);接下来,我们需要获取每个多边形的中心,然后将其转换成 ArrayView1。
letcenter = poly .getattr(py, "center")? // Python-style getattr, requires a GIL token (`py`)..extract::<PyReadonlyArray1<f64>>(py)? // Tell PyO3 what to convert the result to..as_array // Like `point` before..to_owned; // We need one of the sides of the `-` to be "owned".虽然信息量有点大,但总的来说,结果就是逐行转换原来的代码:
usepyo3::prelude::*;usendarray_linalg::Norm;usenumpy::PyReadonlyArray1;#[pyfunction]fnfind_close_polygons(py: Python<'_>,polygons: Vec<PyObject>,point: PyReadonlyArray1<f64>,max_dist: f64,)-> PyResult<Vec<PyObject>> {letmut close_polygons = vec![];letpoint = point.as_array;forpoly in polygons {letcenter = poly.getattr(py,"center")?.extract: :<PyReadonlyArray1<f64>>(py)?.as_array.to_owned;if(center - point).norm < max_dist {close_polygons.push(poly)}}Ok(close_polygons)}对比一下原来的代码:
deffind_close_polygons(polygon_subset: List[Polygon], point: np.array, max_dist: float)-> List[Polygon]: close_polygons = []forpoly inpolygon_subset: ifnp.linalg.norm(poly.center - point) < max_dist: close_polygons.append(poly)returnclose_polygons我们希望这个版本优于原来的函数,但究竟有多少提升呢?
$( cd./poly_match_rs/ && maturin develop) $python measure.py Took an avg of 609.46ms per iteration看起来 Rust 非常慢?实则不然,使用maturin develop --release运行,就能获得更好的结果:
$( cd./poly_match_rs/ && maturin develop --release) $python measure.py Took an avg of 23.44ms per iteration这个速度提升很不错啊。
我们还想查看我们的原生代码,因此发布时需要启用调试符号。即便启用了调试,我们也希望看到最大速度。
# added to Cargo.toml[profile.release]debug= true# Debug symbols for our profiler. lto= true# Link-time optimization. codegen-units= 1# Slower compilation but faster code.第二版:用 Rust 重写更多代码
接下来,在 py-spy 中通过 --native 标志,查看 Python 代码与新版的原生代码。
再次运行 py-spy:
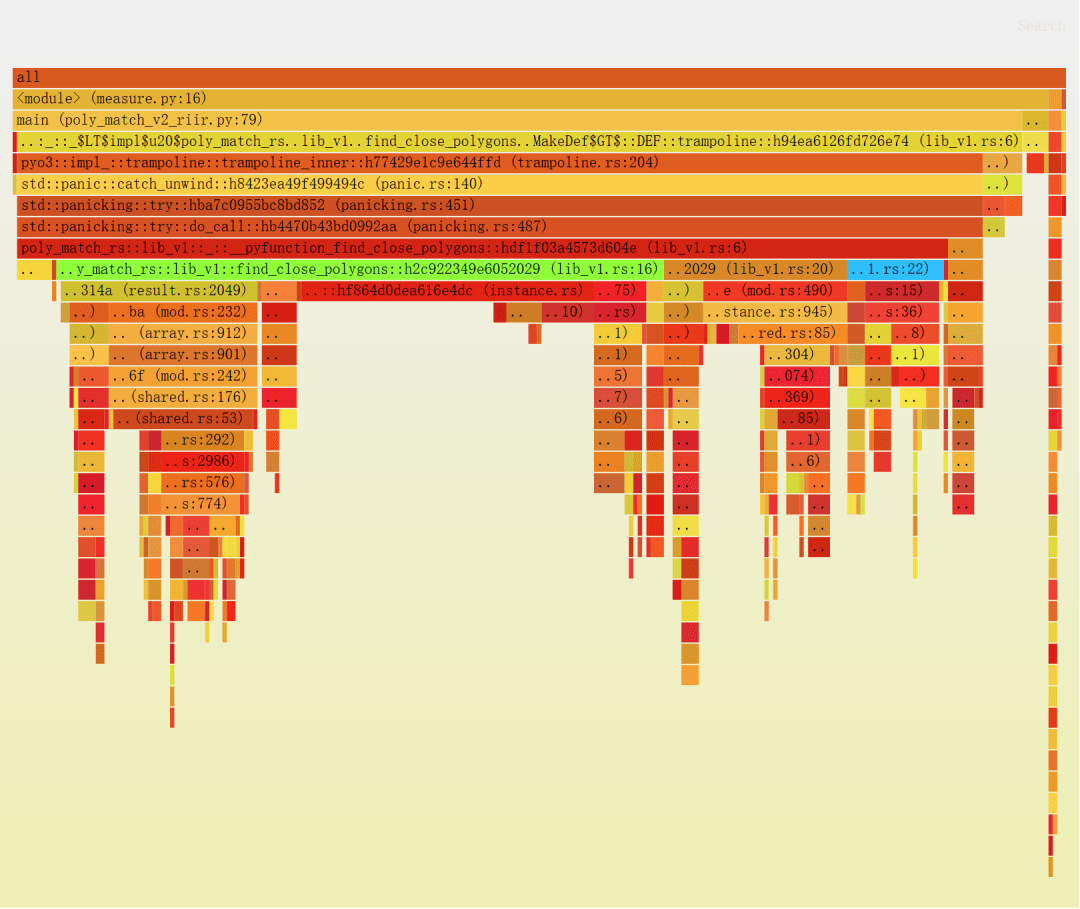
$py-spy record --native -o profile.svg -- python measure.py py-spy>Sampling process 100 timesa second. Press Control-C to exit.这次得到的火焰图如下所示(添加红色之外的颜色,以方便参考):

看看分析器的输出,我们发现了一些有趣的事情:
1.find_close_polygons::...::trampoline(Python 直接调用的符号)和__pyfunction_find_close_polygons(我们的实现)的相对大小。
▶ 可以看到二者分别占据了样本的 95% 和 88%,因此额外开销非常小。
2.实际逻辑(if (center - point).norm < max_dist { ... }) 是 lib_v1.rs:22(右侧非常小的框),大约占总运行时间的 9%。
▶ 所以应该可以实现 10 倍的提升。
3.大部分时间花在 lib_v1.rs:16 上,它是 poly.getattr(...).extract(...),可以看到实际上只是 getattr 以及使用 as_array 获取底层数组。
也就是说,我们需要专心解决第 3 点,而解决方法是用 Rust 重写 Polygon。
我们来看看目标类:
@dataclassclassPolygon: x:np.array y:np.array _area:float = None @cached_propertydefcenter( self) -> np. array:centroid = np.array([ self.x, self.y]).mean(axis= 1) returncentroid defarea( self) -> float:ifself._area is None:self._area = 0. 5* np.abs( np.dot( self.x, np.roll( self.y, 1)) - np.dot( self.y, np.roll( self.x, 1)) )returnself._area我们希望尽可能保留现有的 API,但我们不需要 area 的速度大幅提升。
实际的类可能有其他复杂的东西,比如 merge 方法——使用了 scipy.spatial 中的 ConvexHull。
为了降低成本,我们只将 Polygon 的“核心”功能移至 Rust,然后从 Python 中继承该类来实现 API 的其余部分。
我们的 struct 如下所示:
// `Array1` is a 1d array, and the `numpy` crate will play nicely with it.use ndarray::Array1;// `subclass` tells PyO3 to allow subclassing this in Python.#[pyclass(subclass)]structPolygon{ x: Array1<f64>,y: Array1<f64>,center: Array1<f64>,}下面,我们需要实现这个 struct。我们先公开 poly.{x, y, center},作为:
▶ 属性
▶ numpy 数组
我们还需要一个 constructor,以便 Python 创建新的 Polygon:
usenumpy::{ PyArray1, PyReadonlyArray1, ToPyArray}; #[pymethods]impl Polygon {#[new]fn new(x: PyReadonlyArray1<f64>, y: PyReadonlyArray1<f64>) -> Polygon { let x = x.as_array;let y = y.as_array;let center = Array1::from_vec(vec![x.mean.unwrap, y.mean.unwrap]);Polygon {x: x.to_owned,y: y.to_owned,center,}}// the `Py<..>` in the return type is a way of saying "an Object owned by Python".#[getter] fn x(& self, py: Python< '_>) -> PyResult<Py<PyArray1<f64>>> {Ok(self.x.to_pyarray(py).to_owned) // Create a Python-owned, numpy version of `x`.}// Same for `y` and `center`.}
我们需要将这个新的 struct 作为类添加到模块中:
#[pymodule]fn poly_match_rs(_py: Python, m: &PyModule) -> PyResult<> {m.add_class::<Polygon>?; // new.m.add_function(wrap_py function!( find_close_polygons, m)?)? ; Ok()}然后更新 Python 代码:
classPolygon(poly_match_rs.Polygon): _area: float = Nonedefarea(self)-> float: ...下面,编译代码——虽然可以运行,但速度非常慢!
为了提高性能,我们需要从 Python 的 Polygon 列表中提取基于 Rust 的 Polygon。
PyO3 可以非常灵活地处理这类操作,所以我们可以通过几种方法来完成。我们有一个限制是我们还需要返回 Python 的 Polygon,而且我们不想克隆任何实际数据。
我们可以针对每个 PyObject 调用 .extract::<Polygon>(py)?,但也可以要求 PyO3 直接给我们 Py<Polygon>。
这是对 Python 拥有的对象的引用,我们希望它包含原生 pyclass 结构的实例(或子类,在我们的例子中)。
#[py function] fnfind_close_polygons( py: Python<'_>,polygons: Vec<Py<Polygon>>, // References to Python-owned objects.point: PyReadonlyArray1<f64>,max_dist: f64,) -> PyResult< Vec< Py< Polygon>>> { // Return the same `Py` references, unmodified.letmut close_polygons = vec![]; letpoint = point.as_array; forpoly inpolygons { letcenter = poly.borrow(py).center // Need to use the GIL (`py`) to borrow the underlying `Polygon`..to_owned;if(center - point).norm < max_dist { close_polygons.push(poly)}}Ok(close_polygons)}下面,我们来看看使用这些代码的效果如何:
$ python measure.pyTook an avg of6.29ms per iteration我们快要成功了,只需再提升一倍的速度即可。
第三版:避免内存分配
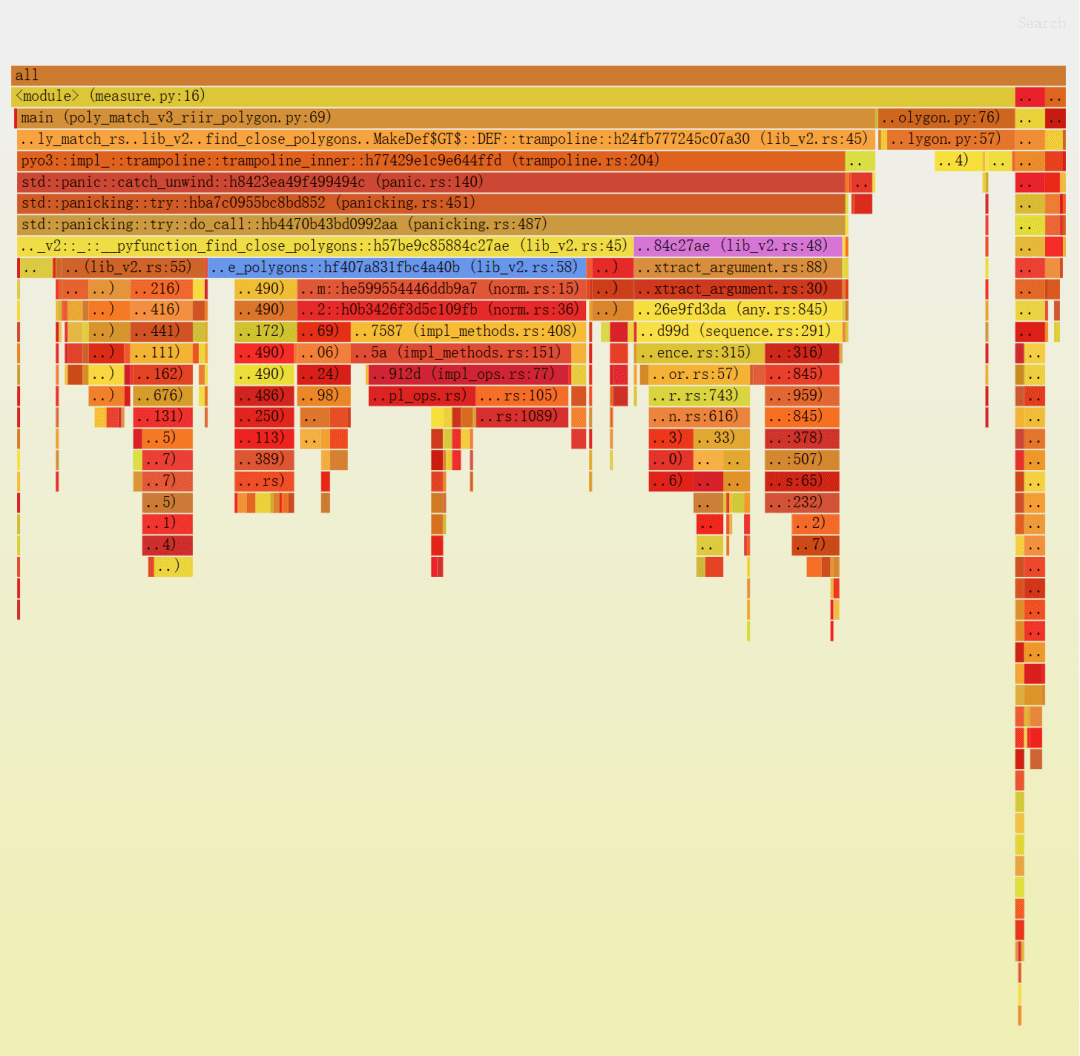
我们再来看一看分析器的结果。

1.首先,我们看到 select_best_polygon,现在它调用的是一些 Rust 代码(在获取 x 和 y 向量时)。
▶ 我们可以解决这个问题,但这是一个非常小的提升(大约为 10%)。
2.我们看到 extract_argument 花费了大约 20% 的时间(在 lib_v2.rs:48 下),这个开销相对比较大。
▶ 但大部分时间都花在了 PyIterator::next 和 PyTypeInfo::is_type_of 中,这可不容易修复。
3.我们看到大量时间花在了内存分配上。
▶ lib_v2.rs:58 是我们的 if 语句,我们还看到了drop_in_place和to_owned。
▶ 实际的代码大约占总时间的 35%,远超我们的预期。所有数据都已存在,所以这一段本应非常快。
下面,我们来解决最后一点。
有问题的代码如下:
letcenter = poly.borrow(py).center .to_owned;if(center - point).norm < max_dist { ... }我们希望避免 to_owned。但是,我们需要一个已拥有的 norm 对象,所以我们必须手动实现。
具体的写法如下:
use ndarray_linalg::Scalar;let center = &poly.as_ref(py).borrow.center;if((center[ 0] - point[ 0]).square + (center[ 1] - point[ 1]).square). sqrt< max_dist { close_polygons.push(poly)}然而,借用检查器报错了:
error[E0505]: cannot move out of `poly`because it is borrowed --> src/lib. rs:58:33|55 |let center = &poly.as_ref(py).borrow.center; | ------------------------|||borrow of `poly`occurs here | a temporary with access to the borrow is created here ......58 |close_polygons.push(poly); | ^^^^ move out of `poly` occurs here59 |} 60| }|- ... andthe borrow might be used here, whenthat temporary is dropped andruns the `Drop`code fortype `PyRef`借用检查器是正确的,我们使用内存的方式不正确。
更简单的修复方法是直接克隆,然后 close_polygons.push(poly.clone) 就可以通过编译了。
这实际上是一个开销很低的克隆,因为我们只增加了 Python 对象的引用计数。
然而,在这个例子中,我们也可以通过一个 Rust 的常用技巧:
letnorm = { letcenter = &poly.as_ref(py).borrow.center; ((center[ 0] - point[ 0]).square + (center[ 1] - point[ 1]).square).sqrt };ifnorm < max_dist { close_polygons.push(poly)}由于 poly 只在内部范围内被借用,如果我们接近 close_polygons.pus,编译器就可以知道我们不再持有引用,因此就可以通过编译。
最后的结果:
$ python measure.pyTook an avg of2.90ms per iteration相较于原来的代码,整体性能得到了 100 倍的提升。
总结
我们原来的 Python 代码如下:
@dataclassclassPolygon: x: np.arrayy: np.array_area: float = None@cached_propertydefcenter(self)-> np.array: centroid = np.array([self.x, self.y]).mean(axis= 1) returncentroid defarea(self)-> float: ...deffind_close_polygons(polygon_subset: List[Polygon], point: np.array, max_dist: float)-> List[Polygon]: close_polygons = []forpoly inpolygon_subset: ifnp.linalg.norm(poly.center - point) < max_dist: close_polygons.append(poly)returnclose_polygons # Rest of file (main, select_best_polygon).我们使用 py-spy 对其进行了分析,即便用最简单的、逐行转换的 find_close_polygons,也可以获得 10 倍的性能提升。
我们反复进行分析-修改代码-测量结果,并最终获得了 100 倍的性能提升,同时 API 仍然保持与原来的库相同。

最终得到的 Python 代码如下:
importpoly_match_rs frompoly_match_rs importfind_close_polygons classPolygon(poly_match_rs.Polygon): _area: float = Nonedefarea(self)-> float: ...# Rest of file unchanged (main, select_best_polygon).调用的 Rust 代码如下:
usepyo3::prelude::*;usendarray::Array1;usendarray_linalg::Scalar;usenumpy::{PyArray1, PyReadonlyArray1, ToPyArray};#[pyclass(subclass)]structPolygon {x: Array1<f64>,y: Array1<f64>,center: Array1<f64>,}#[pymethods]implPolygon {#[new]fnnew(x: PyReadonlyArray1<f64>, y: PyReadonlyArray1<f64>) -> Polygon {letx = x.as_array;lety = y.as_array;letcenter = Array1::from_vec(vec![x.mean.unwrap, y.mean.unwrap]);Polygon{x: x.to_owned,y: y.to_owned,center,}}#[getter]fnx(&self, py: Python<'_>) -> PyResult<Py<PyArray1<f64>>> {Ok(self.x.to_pyarray(py).to_owned)}//Same for `y` and `center`.}#[pyfunction]fnfind_close_polygons(py: Python<'_>,polygons: Vec<Py<Polygon>>,point: PyReadonlyArray1<f64>,max_dist: f64,)-> PyResult<Vec<Py<Polygon>>> {letmut close_polygons = vec![];letpoint = point.as_array;forpoly in polygons {letnorm = {letcenter = &poly.as_ref(py).borrow.center;((center[0]- point[0]).square + (center[1] - point[1]).square).sqrt};ifnorm < max_dist {close_polygons.push(poly)}}Ok(close_polygons)}#[pymodule]fnpoly_match_rs(_py: Python, m: &PyModule) -> PyResult<> {m.add_class: :<Polygon>?;m.add_function(wrap_pyfunction!(find_close_polygons,m)?)?;Ok()}要点总结
▶ Rust(在 PyO3 的帮助下)能够以非常小的代价换取 Python 代码性能的大幅提升。
▶ 对于研究人员来说,Python API 非常优秀,同时使用 Rust 快速构建基本功能是一个非常强大的组合。
▶ 分析非常有趣,可以帮助你了解代码中的一切。
▶最希望ChatGPT开源,一半开发者参与过开源贡献,63%的人在用爱发电|中国开源开发者现状
▶ 微软总裁称中国将是 ChatGPT 主要对手;曝苹果 M3 芯片下半年量产;linux 6.3 正式发布|极客头条
▶ ChatGPT 抢不走程 序员饭碗的原因找到了?最新研究:它自动生成了 21 个程序,16 个有漏 洞