
开源版 Nginx 最为人诟病的就是不具备动态配置、远程 API 及集群管理的能力,而 APISIX 作为 CNCF 毕业的开源七层网关,基于 etcd、Lua 实现了对 Nginx 集群的动态管理。
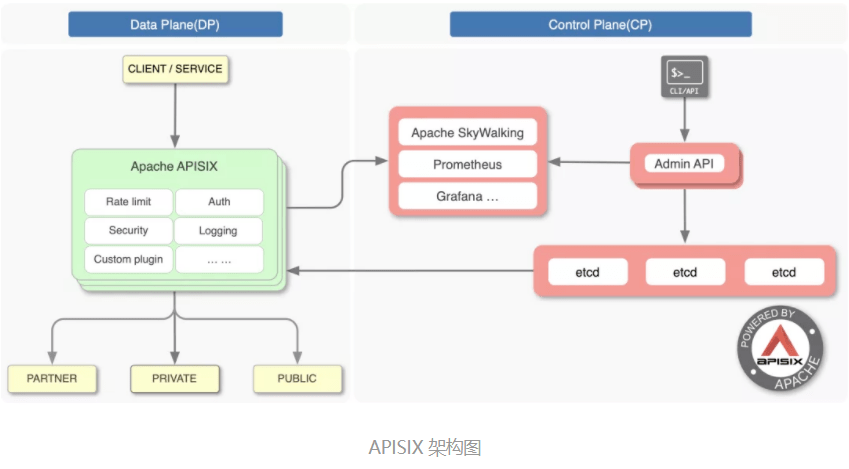
让 Nginx 具备动态、集群管理能力并不容易,因为这将面临以下问题:
APISIX 基于 Lua 定时器及 lua-resty-etcd 模块实现了配置的动态管理,本文将基于 APISIX2.8、OpenResty1.19.3.2、Nginx1.19.3 分析 APISIX 实现 REST API 远程控制 Nginx 集群的原理。
管理集群必须依赖中心化的配置,etcd 就是这样一个数据库。APISIX 没有选择关系型数据库作为配置中心,是因为 etcd 具有以下 2 个优点:
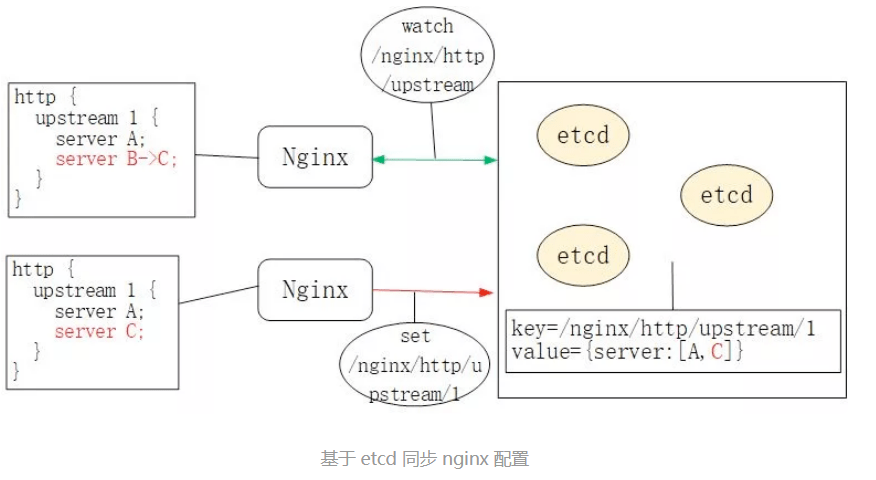
因此,不同于Orange采用 MySQL、Kong采用 PostgreSQL 作为配置中心(这二者同样是基于 OpenResty 实现的 API Gateway),APISIX 采用了 etcd 作为中心化的配置组件。
因此,你可以在生产环境的 APISIX 中通过 etcdctl 看到如下的类似配置:
$ etcdctl get "/apisix/upstreams/1"
/apisix/upstreams/1
{"hash_on":"vars","nodes":{"httpbin.org:80":1},"create_time":1627982128,"update_time":1627982128,"scheme":"http","type":"roundrobin","pass_host":"pass","id":"1"}
其中,/apisix 这个前缀可以在 conf/config.yaml 中修改,比如:
etcd:
host:
- "http://127.0.0.1:2379"
prefix: /apisix ## apisix configurations prefix
而 upstreams/1 就等价于 nginx.conf 中的 http { upstream 1 {} }配置。类似关键字还有/apisix/services/、/apisix/routes/等,不一而足。
那么,Nginx 是怎样通过 watch 机制获取到 etcd 配置数据变化的呢?有没有新启动一个 agent 进程?它通过 HTTP/1.1 还是 gRPC 与 etcd 通讯的?
APISIX 并没有启动 Nginx 以外的进程与 etcd 通讯。它实际上是通过 ngx.timer.at 这个定时器实现了 watch 机制。为了方便对 OpenResty 不太了解的同学,我们先来看看 Nginx 中的定时器是如何实现的,它是 watch 机制实现的基础。
Nginx 采用了 epoll + nonblock socket 这种多路复用机制实现事件处理模型,其中每个 worker 进程会循环处理网络 IO 及定时器事件:
//参见Nginx的src/os/unix/ngx_process_cycle.c文件
static void
ngx_worker_process_cycle(ngx_cycle_t *cycle, void *data)
{
for ( ;; ) {
ngx_process_events_and_timers(cycle);
}
}
// 参见ngx_proc.c文件
void
ngx_process_events_and_timers(ngx_cycle_t *cycle)
{
timer = ngx_event_find_timer();
(void) ngx_process_events(cycle, timer, flags);
ngx_event_process_posted(cycle, &ngx_posted_accept_events);
ngx_event_expire_timers();
ngx_event_process_posted(cycle, &ngx_posted_events);
}
ngx_event_expire_timers 函数会调用所有超时事件的 handler 方法。事实上,定时器是由红黑树(一种平衡有序二叉树)实现的,其中 key 是每个事件的绝对过期时间。这样,只要将最小节点与当前时间做比较,就能快速找到过期事件。
当然,以上 C 函数开发效率很低。因此,OpenResty 封装了 Lua 接口,通过ngx.timer.at将 ngx_timer_add 这个 C 函数暴露给了 Lua 语言:
//参见OpenResty /ngx_lua-0.10.19/src/ngx_http_lua_timer.c文件
void
ngx_http_lua_inject_timer_api(lua_State *L)
{
lua_createtable(L, 0 /* narr */, 4 /* nrec */); /* ngx.timer. */
lua_pushcfunction(L, ngx_http_lua_ngx_timer_at);
lua_setfield(L, -2, "at");
lua_setfield(L, -2, "timer");
}
static int
ngx_http_lua_ngx_timer_at(lua_State *L)
{
return ngx_http_lua_ngx_timer_helper(L, 0);
}
static int
ngx_http_lua_ngx_timer_helper(lua_State *L, int every)
{
ngx_event_t *ev = NULL;
ev->handler = ngx_http_lua_timer_handler;
ngx_add_timer(ev, delay);
}
因此,当我们调用 ngx.timer.at 这个 Lua 定时器时,就是在 Nginx 的红黑树定时器里加入了 ngx_http_lua_timer_handler 回调函数,这个函数不会阻塞 Nginx。
下面我们来看看 APISIX 是怎样使用 ngx.timer.at 的。
Nginx 框架为 C 模块开发提供了许多钩子,而 OpenResty 将部分钩子以 Lua 语言形式暴露了出来,如下图所示:
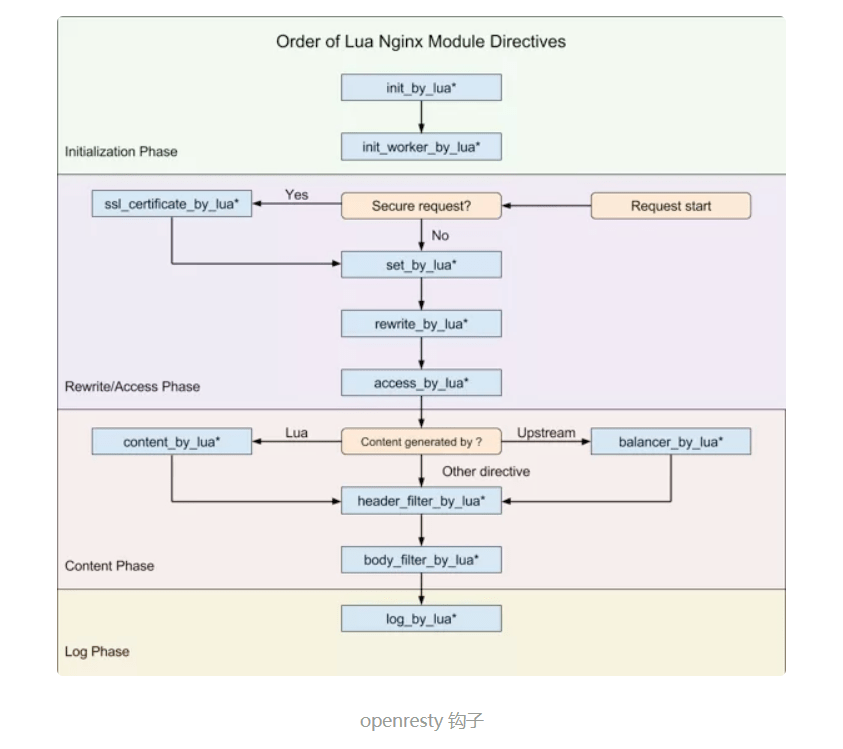
APISIX 仅使用了其中 8 个钩子(注意,APISIX 没有使用 set_by_lua 和 rewrite_by_lua,rewrite 阶段的 plugin 其实是 APISIX 自定义的,与 Nginx 无关),包括:
准备好上述知识后,我们就可以回答 APISIX 是怎样接收 etcd 数据的更新了。
每个 Nginx Worker 进程都会在 init_worker_by_lua 阶段通过 http_init_worker 函数启动定时器:
init_worker_by_lua_block {
apisix.http_init_worker()
}
你可能很好奇,下载 APISIX 源码后没有看到 nginx.conf,这段配置是哪来的?
这里的 nginx.conf 实际是由 APISIX 的启动命令实时生成的。当你执行 make run 时,它会基于 Lua 模板 apisix/cli/ngx_tpl.lua 文件生成 nginx.conf。请注意,这里的模板规则是 OpenResty 自实现的,语法细节参见lua-resty-template。生成 nginx.conf 的具体代码参见 apisix/cli/ops.lua 文件:
local template = require("resty.template")
local ngx_tpl = require("apisix.cli.ngx_tpl")
local function init(env)
local yaml_conf, err = file.read_yaml_conf(env.apisix_home)
local conf_render = template.compile(ngx_tpl)
local ngxconf = conf_render(sys_conf)
local ok, err = util.write_file(env.apisix_home .. "/conf/nginx.conf",
ngxconf)
当然,APISIX 允许用户修改 nginx.conf 模板中的部分数据,具体方法是模仿 conf/config-default.yaml 的语法修改 conf/config.yaml 配置。其实现原理参见 read_yaml_conf 函数:
function _M.read_yaml_conf(apisix_home)
local local_conf_path = profile:yaml_path("config-default")
local default_conf_yaml, err = util.read_file(local_conf_path)
local_conf_path = profile:yaml_path("config")
local user_conf_yaml, err = util.read_file(local_conf_path)
ok, err = merge_conf(default_conf, user_conf)
end
可见,ngx_tpl.lua 模板中仅部分数据可由 yaml 配置中替换,其中 conf/config-default.yaml 是官方提供的默认配置,而 conf/config.yaml 则是由用户自行覆盖的自定义配置。如果你觉得仅替换模板数据还不够,大可以直接修改 ngx_tpl 模板。
APISIX 将需要监控的配置以不同的前缀存入了 etcd,目前包括以下 11 种:
这里每类配置对应的处理逻辑都不相同,因此 APISIX 抽象出 apisix/core/config_etcd.lua 文件,专注 etcd 上各类配置的更新维护。在 http_init_worker 函数中每类配置都会生成 1 个 config_etcd 对象:
function _M.init_worker()
local err
plugin_configs, err = core.config.new("/plugin_configs", {
automatic = true,
item_schema = core.schema.plugin_config,
checker = plugin_checker,
})
end
而在 config_etcd 的 new 函数中,则会循环注册_automatic_fetch 定时器:
function _M.new(key, opts)
ngx_timer_at(0, _automatic_fetch, obj)
end
_automatic_fetch 函数会反复执行 sync_data 函数(包装到 xpcall 之下是为了捕获异常):
local function _automatic_fetch(premature, self)
local ok, err = xpcall(function()
local ok, err = sync_data(self)
end, debug.traceback)
ngx_timer_at(0, _automatic_fetch, self)
end
sync_data 函数将通过 etcd 的 watch 机制获取更新,它的实现机制我们接下来会详细分析。
总结下:
APISIX 在每个 Nginx Worker 进程的启动过程中,通过 ngx.timer.at 函数将_automatic_fetch 插入定时器。_automatic_fetch 函数执行时会通过 sync_data 函数,基于 watch 机制接收 etcd 中的配置变更通知,这样,每个 Nginx 节点、每个 Worker 进程都将保持最新的配置。如此设计还有 1 个明显的优点:etcd 中的配置直接写入 Nginx Worker 进程中,这样处理请求时就能直接使用新配置,无须在进程间同步配置,这要比启动 1 个 agent 进程更简单!
sync_data 函数到底是怎样获取 etcd 的配置变更消息的呢?先看下 sync_data 源码:
local etcd = require("resty.etcd")
etcd_cli, err = etcd.new(etcd_conf)
local function sync_data(self)
local dir_res, err = waitdir(self.etcd_cli, self.key, self.prev_index + 1, self.timeout)
end
local function waitdir(etcd_cli, key, modified_index, timeout)
local res_func, func_err, http_cli = etcd_cli:watchdir(key, opts)
if http_cli then
local res_cancel, err_cancel = etcd_cli:watchcancel(http_cli)
end
end
这里实际与 etcd 通讯的是lua-resty-etcd 库。它提供的 watchdir 函数用于接收 etcd 发现 key 目录对应 value 变更后发出的通知。
watchcancel 函数又是做什么的呢?这其实是 OpenResty 生态的缺憾导致的。etcd v3 已经支持高效的 gRPC 协议(底层为 HTTP2 协议)。你可能听说过,HTTP2 不但具备多路复用的能力,还支持服务器直接推送消息,从 HTTP3 协议对照理解 HTTP2:
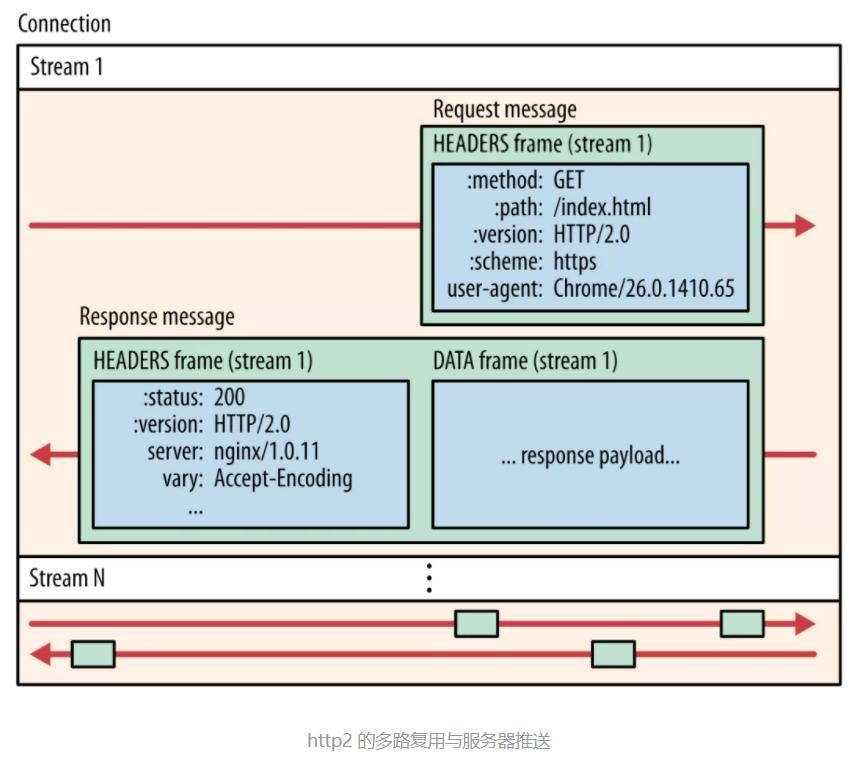
然而,**Lua 生态目前并不支持 HTTP2 协议!**所以 lua-resty-etcd 库实际是通过低效的 HTTP/1.1 协议与 etcd 通讯的,因此接收/watch 通知也是通过带有超时的/v3/watch 请求完成的。这个现象其实是由 2 个原因造成的:
使用 HTTP/1.1 的 lua-resty-etcd 库其实很低效,如果你在 APISIX 上抓包,会看到频繁的 POST 报文,其中 URI 为/v3/watch,而 Body 是 编码的 watch 目录:
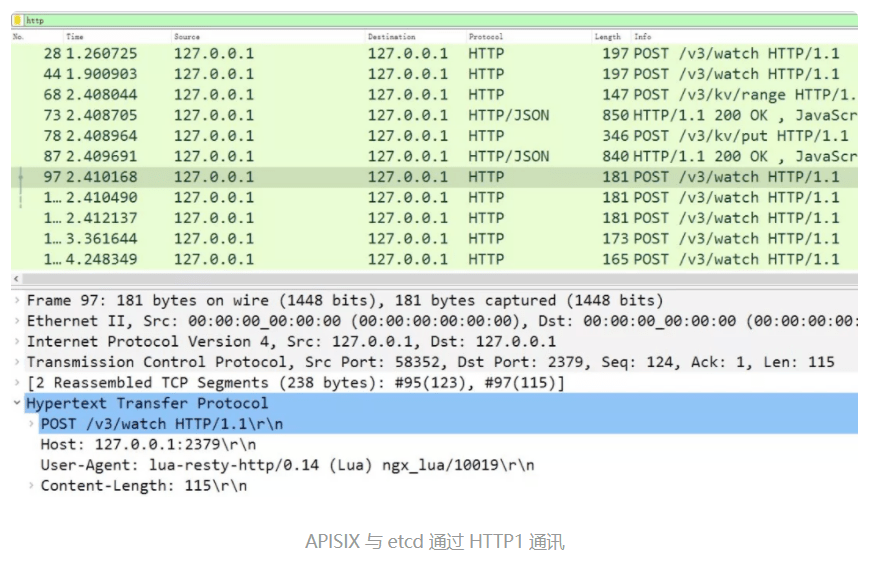
我们可以验证下 watchdir 函数的实现细节:
-- lib/resty/etcd/v3.lua文件
function _M.watchdir(self, key, opts)
return watch(self, key, attr)
end
local function watch(self, key, attr)
callback_fun, err, http_cli = request_chunk(self, 'POST', '/watch',
opts, attr.timeout or self.timeout)
return callback_fun
end
local function request_chunk(self, method, path, opts, timeout)
http_cli, err = utils.http.new()
-- 发起TCP连接
endpoint, err = http_request_chunk(self, http_cli)
-- 发送HTTP请求
res, err = http_cli:request({
method = method,
path = endpoint.api_prefix .. path,
body = body,
query = query,
headers = headers,
})
end
local function http_request_chunk(self, http_cli)
local endpoint, err = choose_endpoint(self)
ok, err = http_cli:connect({
scheme = endpoint.scheme,
host = endpoint.host,
port = endpoint.port,
ssl_verify = self.ssl_verify,
ssl_cert_path = self.ssl_cert_path,
ssl_key_path = self.ssl_key_path,
})
return endpoint, err
end
可见,APISIX 在每个 worker 进程中,通过 ngx.timer.at 和 lua-resty-etcd 库反复请求 etcd,以此保证每个 Worker 进程中都含有最新的配置。
接下来,我们看看怎样远程修改 etcd 中的配置。
我们当然可以直接通过 gRPC 接口修改 etcd 中相应 key 的内容,再基于上述的 watch 机制使得 Nginx 集群自动更新配置。然而,这样做的风险很大,因为配置请求没有经过校验,进面导致配置数据与 Nginx 集群不匹配!
APISIX 提供了这么一种机制:访问任意 1 个 Nginx 节点,通过其 Worker 进程中的 Lua 代码校验请求成功后,再由/v3/dv/put 接口写入 etcd 中。下面我们来看看 APISIX 是怎么实现的。
首先,make run 生成的 nginx.conf 会自动监听 9080 端口(可通过 config.yaml 中 apisix.node_listen 配置修改),当 apisix.enable_admin 设置为 true 时,nginx.conf 就会生成以下配置:
server {
listen 9080 default_server reuseport;
location /apisix/admin {
content_by_lua_block {
apisix.http_admin()
}
}
}
这样,Nginx 接收到的/apisix/admin 请求将被 http_admin 函数处理:
-- /apisix/init.lua文件
function _M.http_admin()
local ok = router:dispatch(get_var("uri"), {method = get_method()})
end
admin 接口能够处理的 API ,其中,当 method 方法与 URI 不同时,dispatch 会执行不同的处理函数,其依据如下:
-- /apisix/admin/init.lua文件
local uri_route = {
{
paths = [[/apisix/admin/*]],
methods = {"GET", "PUT", "POST", "DELETE", "PATCH"},
handler = run,
},
{
paths = [[/apisix/admin/stream_routes/*]],
methods = {"GET", "PUT", "POST", "DELETE", "PATCH"},
handler = run_stream,
},
{
paths = [[/apisix/admin/plugins/list]],
methods = {"GET"},
handler = get_plugins_list,
},
{
paths = reload_event,
methods = {"PUT"},
handler = post_reload_plugins,
},
}
比如,当通过/apisix/admin/upstreams/1 和 PUT 方法创建 1 个 Upstream 上游时:
$ curl "http://127.0.0.1:9080/apisix/admin/upstreams/1" -H "X-API-KEY: edd1c9f034335f136f87ad84b625c8f1" -X PUT -d '
> {
> "type": "roundrobin",
> "nodes": {
> "httpbin.org:80": 1
> }
> }'
{"action":"set","node":{"key":"/apisix/upstreams/1","value":{"hash_on":"vars","nodes":{"httpbin.org:80":1},"create_time":1627982128,"update_time":1627982128,"scheme":"http","type":"roundrobin","pass_host":"pass","id":"1"}}}
你会在 error.log 中会看到如下日志(想看到这行日志,必须将 config.yaml 中的 nginx_config.error_log_level 设为 INFO):
2021/08/03 17:15:28 [info] 16437#16437: *23572 [lua] init.lua:130: handler(): uri: ["","apisix","admin","upstreams","1"], client: 127.0.0.1, server: _, request: "PUT /apisix/admin/upstreams/1 HTTP/1.1", host: "127.0.0.1:9080"
这行日志实际是由/apisix/admin/init.lua 中的 run 函数打印的,它的执行依据是上面的 uri_route 字典。我们看下 run 函数的内容:
-- /apisix/admin/init.lua文件
local function run()
local uri_segs = core.utils.split_uri(ngx.var.uri)
core.log.info("uri: ", core.json.delay_encode(uri_segs))
local seg_res, seg_id = uri_segs[4], uri_segs[5]
local seg_sub_path = core.table.concat(uri_segs, "/", 6)
local resource = resources[seg_res]
local code, data = resource[method](seg_id, req_body, seg_sub_path,
uri_args)
end
这里 resource[method]函数又被做了 1 次抽象,它是由 resources 字典决定的:
-- /apisix/admin/init.lua文件
local resources = {
routes = require("apisix.admin.routes"),
services = require("apisix.admin.services"),
upstreams = require("apisix.admin.upstreams"),
consumers = require("apisix.admin.consumers"),
schema = require("apisix.admin.schema"),
ssl = require("apisix.admin.ssl"),
plugins = require("apisix.admin.plugins"),
proto = require("apisix.admin.proto"),
global_rules = require("apisix.admin.global_rules"),
stream_routes = require("apisix.admin.stream_routes"),
plugin_metadata = require("apisix.admin.plugin_metadata"),
plugin_configs = require("apisix.admin.plugin_config"),
}
因此,上面的 curl 请求将被/apisix/admin/upstreams.lua 文件的 put 函数处理,看下 put 函数的实现:
-- /apisix/admin/upstreams.lua文件
function _M.put(id, conf)
-- 校验请求数据的合法性
local id, err = check_conf(id, conf, true)
local key = "/upstreams/" .. id
core.log.info("key: ", key)
-- 生成etcd中的配置数据
local ok, err = utils.inject_conf_with_prev_conf("upstream", key, conf)
-- 写入etcd
local res, err = core.etcd.set(key, conf)
end
-- /apisix/core/etcd.lua
local function set(key, value, ttl)
local res, err = etcd_cli:set(prefix .. key, value, {prev_kv = true, lease = data.body.ID})
end
最终新配置被写入 etcd 中。可见,Nginx 会校验数据再写入 etcd,这样其他 Worker 进程、Nginx 节点都将通过 watch 机制接收到正确的配置。上述流程你可以通过 error.log 中的日志验证:
2021/08/03 17:15:28 [info] 16437#16437: *23572 [lua] upstreams.lua:72: key: /upstreams/1, client: 127.0.0.1, server: _, request: "PUT /apisix/admin/upstreams/1 HTTP/1.1", host: "127.0.0.1:9080"
我们再来看 admin 请求执行完 Nginx Worker 进程可以立刻生效的原理。
开源版 Nginx 的请求匹配是基于 3 种不同的容器进行的:
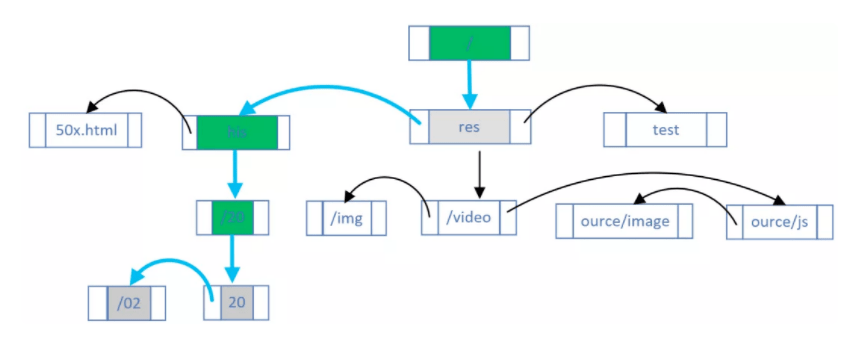
3.在上述 2 个过程中,如果含有正则表达式,则基于数组顺序(在 nginx.conf 中出现的次序)依次匹配。
上述过程虽然执行效率极高,却是写死在 find_config 阶段及 Nginx HTTP 框架中的,**一旦变更必须在 nginx -s reload 后才能生效!**因此,APISIX 索性完全抛弃了上述流程!
从 nginx.conf 中可以看到,访问任意域名、URI 的请求都会匹配到 http_access_phase 这个 lua 函数:
server {
server_name _;
location / {
access_by_lua_block {
apisix.http_access_phase()
}
proxy_pass $upstream_scheme://apisix_backend$upstream_uri;
}
}
而在 http_access_phase 函数中,将会基于 1 个用 C 语言实现的基数前缀树匹配 Method、域名和 URI(仅支持通配符,不支持正则表达式),这个库就是lua-resty-radixtree。每当路由规则发生变化,Lua 代码就会重建这棵基数树:
function _M.match(api_ctx)
if not cached_version or cached_version ~= user_routes.conf_version then
uri_router = base_router.create_radixtree_uri_router(user_routes.values,
uri_routes, false)
cached_version = user_routes.conf_version
end
end
这样,路由变化后就可以不 reload 而使其生效。Plugin 启用、参数及顺序调整的规则与此类似。
最后再提下 Script,它与 Plugin 是互斥的。之前的动态调整改的只是配置,事实上 Lua JIT 的及时编译还提供了另外一个杀手锏 loadstring,它可以将字符串转换为 Lua 代码。因此,在 etcd 中存储 Lua 代码并设置为 Script 后,就可以将其传送到 Nginx 上处理请求了。
Nginx 集群的管理必须依赖中心化配置组件,而高可靠又具备 watch 推送机制的 etcd 无疑是最合适的选择!虽然当下 Resty 生态没有 gRPC 客户端,但每个 Worker 进程直接通过 HTTP/1.1 协议同步 etcd 配置仍不失为一个好的方案。
动态修改 Nginx 配置的关键在于 2 点:Lua 语言的灵活度远高于 nginx.conf 语法,而且 Lua 代码可以通过 loadstring 从外部数据中导入!当然,为了保障路由匹配的执行效率,APISIX 通过 C 语言实现了前缀基数树,基于 Host、Method、URI 进行请求匹配,在保障动态性的基础上提升了性能。
文章来源:云原生实验室
推荐阅读:
前端开发之Nginx单页加载优化
web开发基础篇之Nginx的安装与启动
linux下Nginx的安装方法与介绍
前端开发框架Vue之findIndex() 的使用