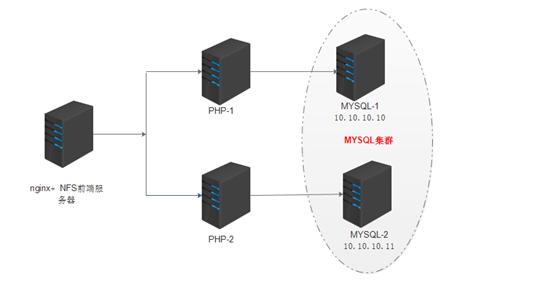
项目之五台服务器实战linux+Nginx+php+MySQL主主+NFS文共享集群架构;
1)部署1台Nginx WEB前端服务器(不能跟PHP-CGI公用); 2)部署2台PHP-CGI网站代码; 3)部署2台MYSQL主主同步架构(可以加入MHA或者DRBD); 4)部署Discuz和wordPress/ target=_blank class=infotextkey>WordPress多域名网站,通过两个域名dz.jf.com|wp.jf.com访问; 5)部署1台NFS文件共享服务器,网站代码统一存放在NFS服务器; 6)通过亿图或者visor将架构图画出来。 7)以上服务器再不影响使用的情况下,可以共用。

实验拓扑图
Mysql服务器节点1:10.10.10.10
Mysql服务器节点2:10.10.10.12
服务器节点1和服务器节点2安装mysql
安装yum install mariadb mariadb-devel mariab-server
启动 systemctl start mariadb
查看端口 netstat -anltp | grep 3306
查看进程 ps -ef | grep mysql
服务器节点1配置修改配置文件 文件路径 /etc/my.cnf
[mysqld]
server-id = 1
log-bin=master1-bin
datadir=/var/lib/mysql
socket=/var/lib/mysql/mysql.sock
symbolic-links=0
[mysqld_safe]
log-error=/var/log/mariadb/mariadb.log
pid-file=/var/run/mariadb/mariadb.pid
!includedir /etc/my.cnf.d
服务器节点2配置修改配置文件 文件路径 /etc/my.cnf
[mysqld]
server-id=2
log-bin=master2-bin
datadir=/var/lib/mysql
socket=/var/lib/mysql/mysql.sock
[mysqld_safe]
log-error=/var/log/mariadb/mariadb.log
pid-file=/var/run/mariadb/mariadb.pid
# include all files from the config directory
!includedir /etc/my.cnf.d
grant replication slave on *.* to tongbu@"%" identified by "123456";
change master to master_host="10.10.10.12",master_user="tongbu",master_password="123456",master_log_file="master2-bin.000001",master_log_pos=684;
开启slave start slave;
grant replication slave on *.* to tongbu@"%" identified by "123456";
change master to master_host="10.10.10.11",master_user="tongbu",master_password="123456",master_log_file="master1-bin.000001",master_log_pos=694;
开启slave start slave;
10.10.10.13
安装依赖包
yum install gcc gcc-c++ -y yum install pcre pcre-devel yum install zlib gzip zlib-devel -y yum -y install gcc gcc-c++ make zlib zlib-devel openssl openssl-devel pcre pcre-devel
.
./configure --prefix=/usr/local/nginx --user=www --group=www --with-http_ssl_module --with-http_stub_status_module
make && make install
/usr/local/nginx/sbin/nginx
Ps –ef | grep nginx
[root@dz nginx]# cat /usr/local/nginx/conf/nginx.conf
user www;
worker_processes 1;
events {
worker_connections 1024;
}
http {
include mime.types;
default_type Application/octet-stream;
#log_format main '$remote_addr - $remote_user [$time_local] "$request" '
# '$status $body_bytes_sent "$http_referer" '
# '"$http_user_agent" "$http_x_forwarded_for"';
sendfile on;
keepalive_timeout 65;
server {
listen 80;
server_name dz.jf.com;
location / {
root /html/dz.jf.com;
index index.php;
}
error_page 500 502 503 504 /50x.html;
location = /50x.html {
root html;
}
location ~ .php$ {
root /html/dz.jf.com;
fastcgi_pass 10.10.10.12:9000;
fastcgi_index index.php;
fastcgi_param SCRIPT_FILENAME $document_root$fastcgi_script_name;
include fastcgi_params;
}
}
server {
listen 80;
server_name wp.jf.com;
location / {
root /html/wp.jf.com;
index index.php;
}
location ~ .php$ {
root /html/wp.jf.com;
fastcgi_pass 10.10.10.14:9000;
fastcgi_index index.php;
fastcgi_param SCRIPT_FILENAME $document_root$fastcgi_script_name;
include fastcgi_params;
}
}
}
10.10.10.12
10.10.10.14
yum install php-devel php-mysql php-fpm -y
Systemctl start php-fpm
[root@bogon wp.dz.com]# ps -ef | grep php
root 1566 1 0 17:57 ? 00:00:00 php-fpm: master process (/etc/php-fpm.conf)
Apache 1568 1566 0 17:57 ? 00:00:00 php-fpm: pool www
apache 1569 1566 0 17:57 ? 00:00:00 php-fpm: pool www
apache 1570 1566 0 17:57 ? 00:00:00 php-fpm: pool www
apache 1571 1566 0 17:57 ? 00:00:00 php-fpm: pool www
apache 1572 1566 0 17:57 ? 00:00:00 php-fpm: pool www
root 1717 1353 0 18:11 pts/1 00:00:00 grep --color=auto php
/etc/php-fpm.d/www.conf
[www]
; Note: This value is mandatory.
listen = 10.10.10.12:9000 #将127.0.0.1改成实际的IP地址
; Set listen(2) backlog. A value of '-1' means unlimited.
; Default Value: -1
;listen.backlog = -1
; Default Value: any
;listen.allowed_clients = 127.0.0.1#注释掉
为了节省机器可以在nginx上面部署NFS服务器
Nginx 服务器节点充当NFS服务段 安装方式如下
yum install nfs* -y
yum portmap* -y
centos7的portmap现在名字是rpcbind
修改/etc/exports 文件
/html/ *(rw,no_root_squash,no_all_squash,sync)
[root@dz html]# ps -ef | grep nfs
root 7045 2 0 19:00 ? 00:00:00 [nfsd4_callbacks]
root 7051 2 0 19:00 ? 00:00:00 [nfsd]
root 7052 2 0 19:00 ? 00:00:00 [nfsd]
root 7053 2 0 19:00 ? 00:00:00 [nfsd]
root 7054 2 0 19:00 ? 00:00:00 [nfsd]
root 7055 2 0 19:00 ? 00:00:00 [nfsd]
root 7056 2 0 19:00 ? 00:00:00 [nfsd]
root 7057 2 0 19:00 ? 00:00:00 [nfsd]
root 7058 2 0 19:00 ? 00:00:00 [nfsd]
root 7705 7607 0 20:15 pts/1 00:00:00 grep --color=auto nfs
yum install nfs* -y
Systemctl start nfs
mount -t nfs 10.10.10.13:/html /html
[root@bogon html]# df -h
文件系统 容量 已用 可用 已用% 挂载点
/dev/sda2 20G 5.8G 15G 29% /
devtmpfs 479M 0 479M 0% /dev
tmpfs 489M 0 489M 0% /dev/shm
tmpfs 489M 6.8M 482M 2% /run
tmpfs 489M 0 489M 0% /sys/fs/cgroup
/dev/sda1 253M 105M 148M 42% /boot
/dev/mapper/centos-data 30G 33M 30G 1% /data
tmpfs 98M 0 98M 0% /run/user/0
10.10.10.13:/html 20G 7.7G 13G 39% /html
在客户端创建文件夹或者文件可以在服务端看到,在服务端创建文件在客户端也可以看到,代表NFS服务正常
n 上传源码包到/html/wp.jf.com目录(上传机器为10.10.10.14 PHP-2)
n 解压 tar –xvf wordpress-4.9.4-zh_CN.tar.gz
n Mv wordpress /* .
n 设置数据库
n 上传源码包到/html/dz.jf.com目录(上传机器为10.10.10.12 PHP-1)
n 解压 tar –xvf Discuz_X3.2_SC_UTF8.zip
n Mv upload/* .
n Chmod 777 * . –R 为了方便设置了777权限
Create wordpress;
Create discuz;
grant all on discuz.* to root@"%" identified by "123456";
grant all on wordpress.* to root@"%" identified by "123456";