请准备64位操作系统的电脑。
• 按步骤装好Anaconda3和PyCharm。
一、开发环境说明
1.电脑配置及系统要求
配置:内存4G或以上
系统:64位,win7或以上(linux/mac OS亦可)
2.Python/ target=_blank class=infotextkey>Python环境
Python是一款免费开源的软件,有很多版本,主要分为Python2.x和Python3.x两个版本系列,这两个版本系列的语法并不兼容,我们学习肯定是用更新的Python3.x系列,目前最新的版本是Python3.8.x,但是我们并不建议你装Python3.8.x,我们建议您使用3.6.x或者3.7.x版本,因为这样的版本相对更稳定并且相应第三方库的支持更及时。由于Python基础环境提供的功能非常简单,在使用时一般需要安装大量的第三方库,作为入门学习者,我们会建议大家使用Python的集成发行版本:Anaconda,里面集成了很多Python常用的第三方库,免去了初学者安装库的烦恼。同时在培训过程中我们会用到一个很强大的代码编辑器:PyCharm,所以请您将它也装好。小结一下,你要装的软件有两个:Anaconda3(里面集成了Python环境)、PyCharm。
二、软件下载
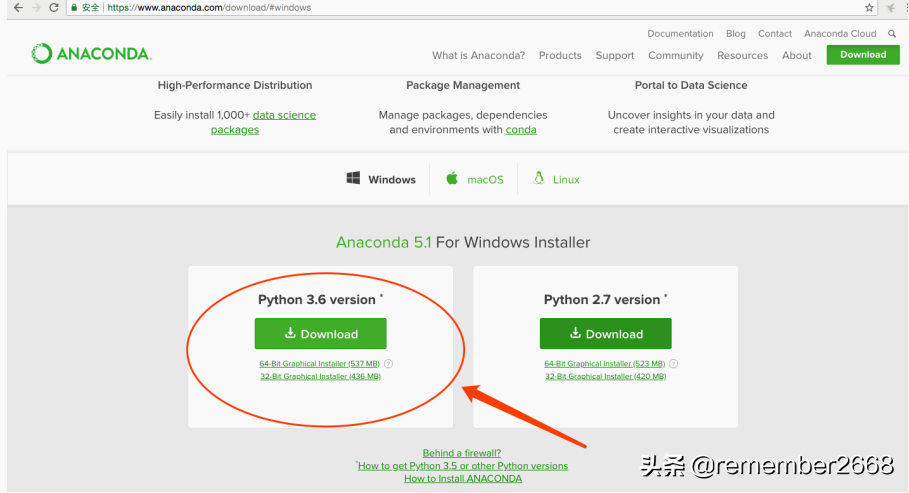
1.Anaconda
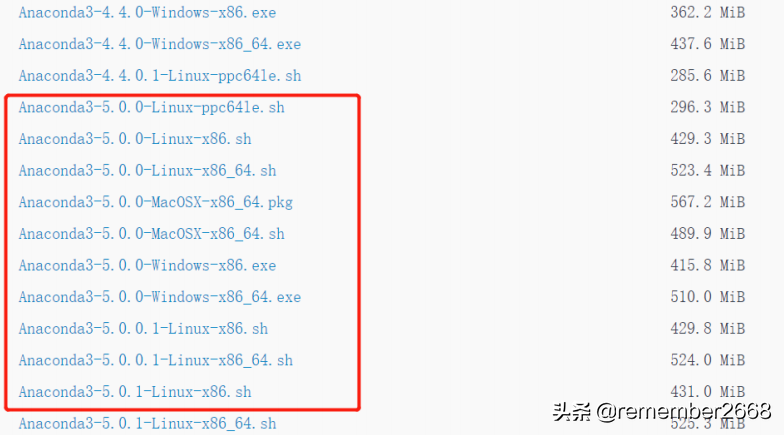
请下载Python集成软件Anaconda3 ,注意选择Python3.6.x或Python3.7.x版本。因为anaconda官网(https://www.anaconda.com/)的服务器在国外,我们访问的 速度一般比 较 慢 , 建议您 去 国 内 镜 像 网 站 (https://mirrors.tuna.tsinghua.edu.cn/anaconda/archive/)下载安装包。Anaconda3的版本请选择Anaconda3-5.0.0。
温馨提示: Anaconda3已经集成了Python环境,即安装Anaconda3后就无需再安装Python。安装时请确认安装包和系统位数对应(百度网盘中提供的安装包为64位),若操作系统是64位则对应安装包名称有"…_64…"的标志。
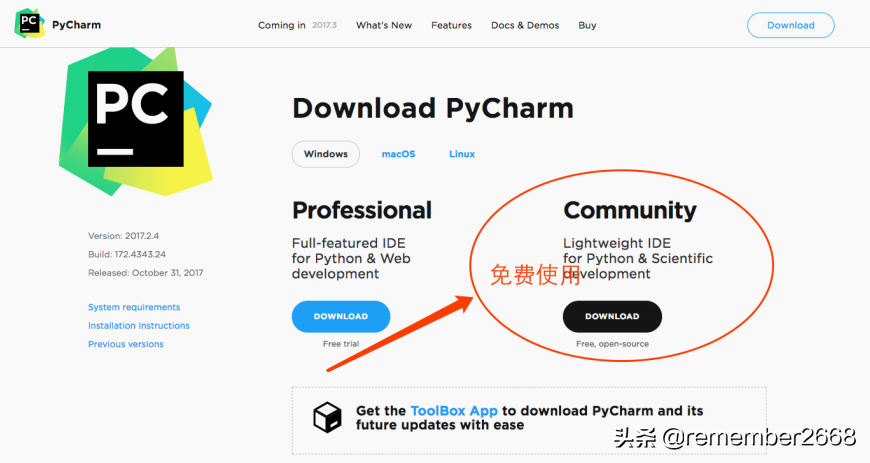
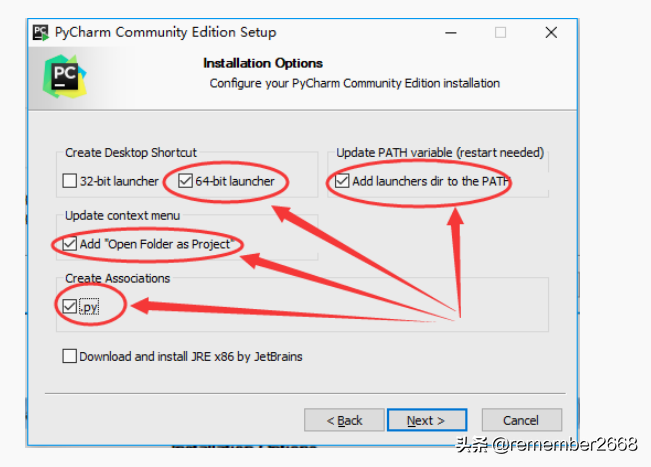
2.PyCharm
官网下载地址:https://www.jetbrains.com/pycharm/download/#section=windows
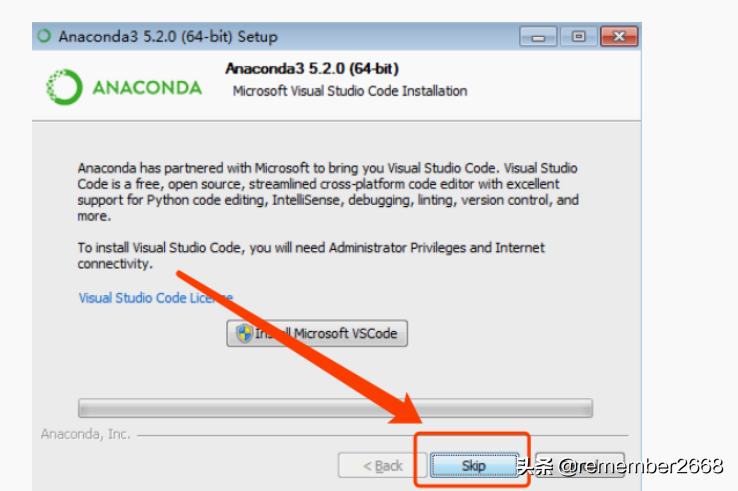
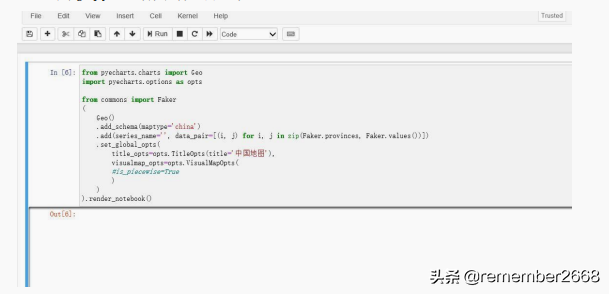
PyCharm是Python的一个编辑器,用它进行代码编辑可提高工作效率。PyCharm分为付费版和免费版,使用免费版即可满足我们需要,如下图。
三、软件安装
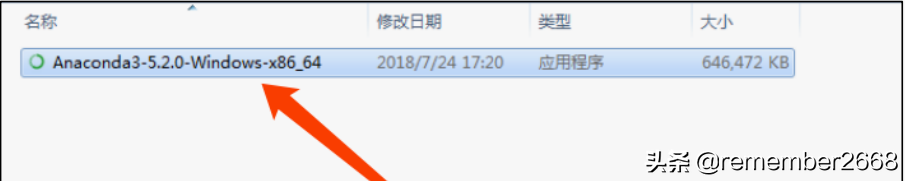
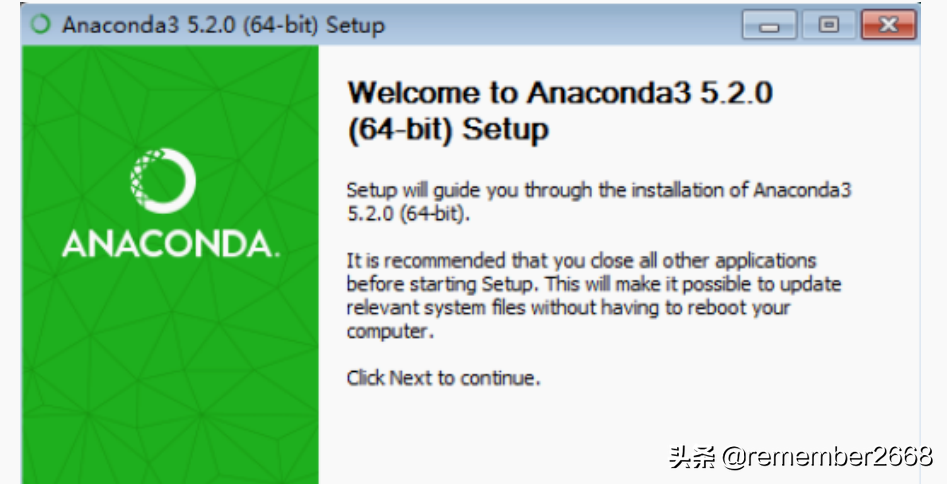
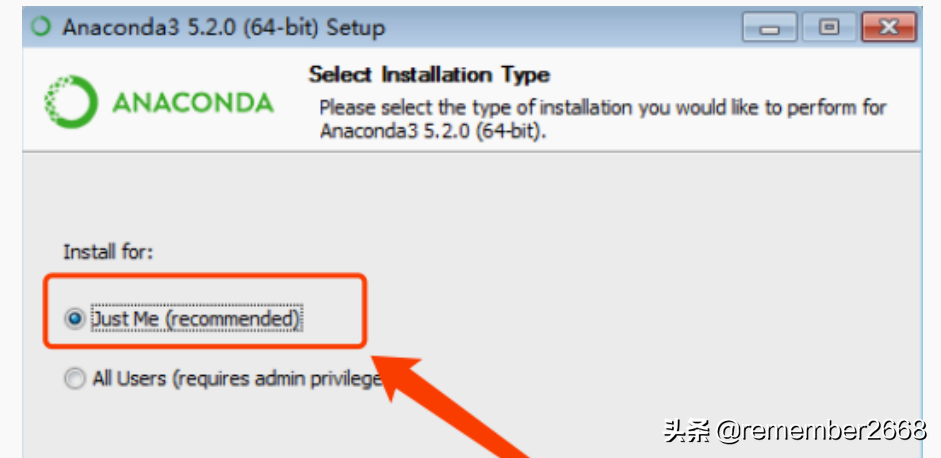
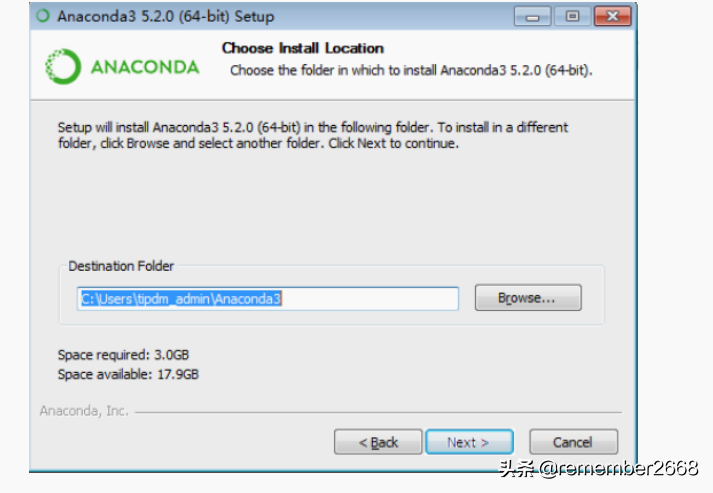
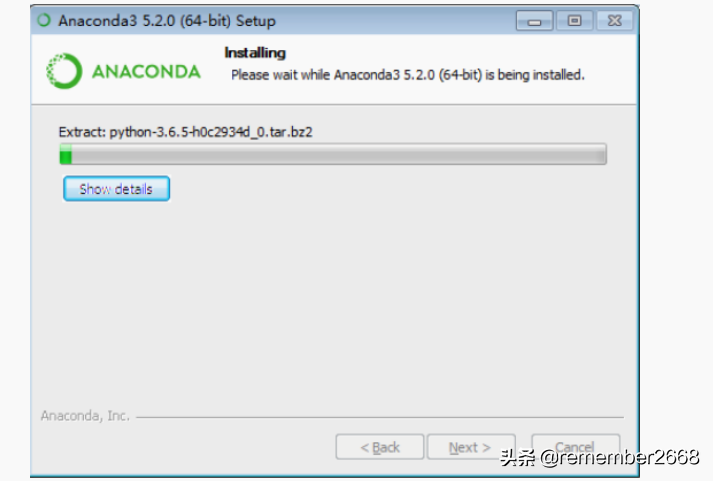
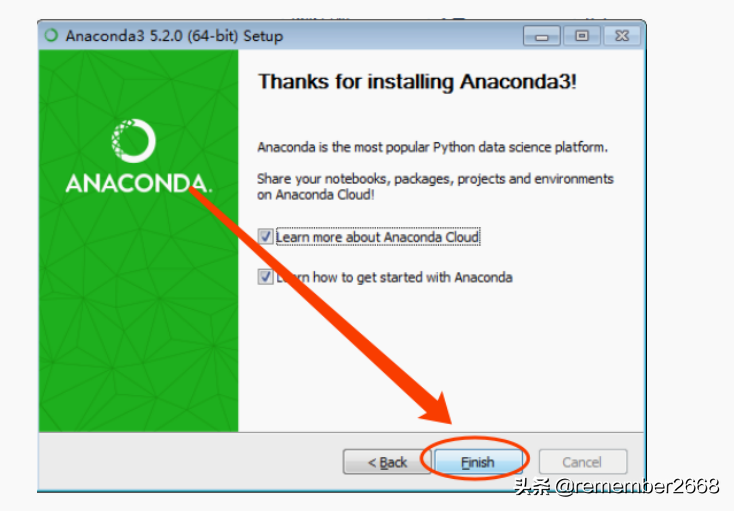
1. 安装Anaconda

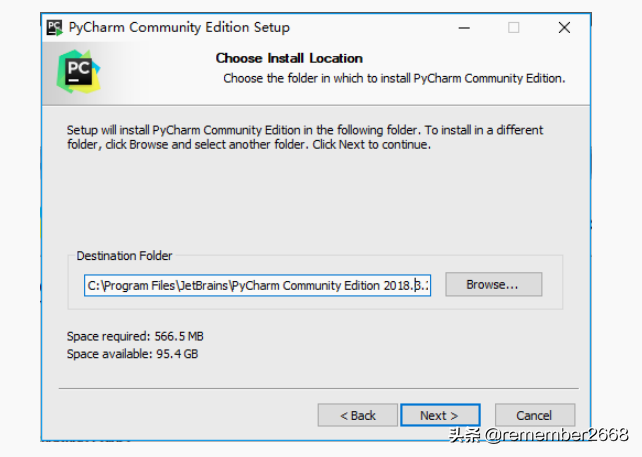
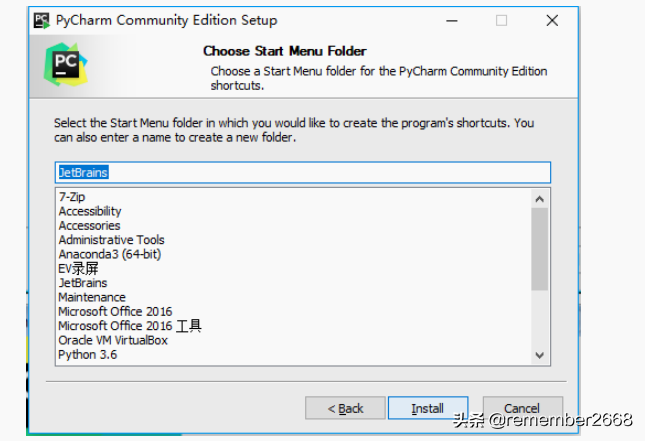
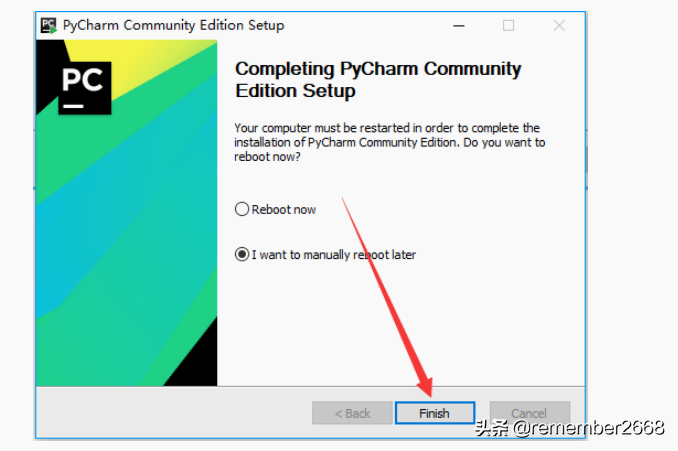
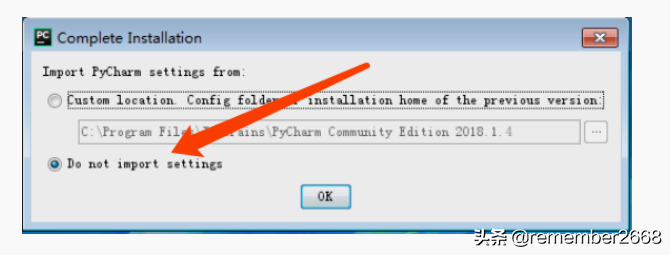
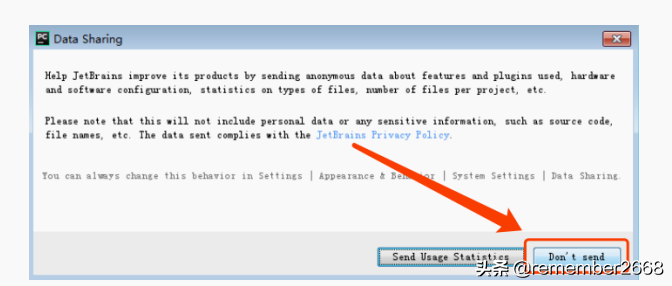
2. 安装pycharm
四、PyCharm 使用
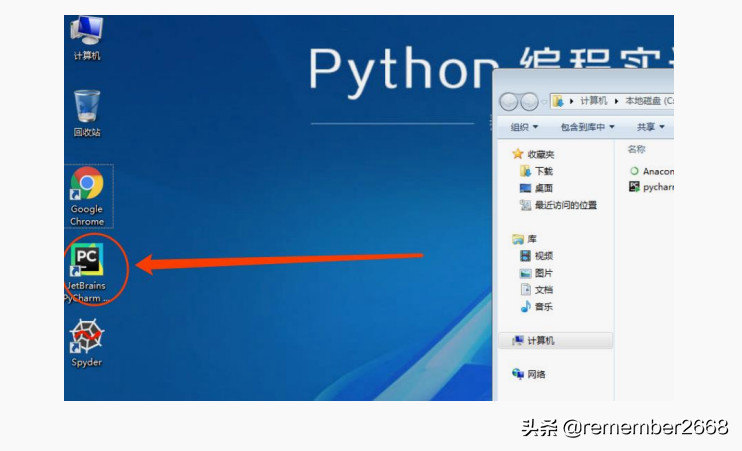
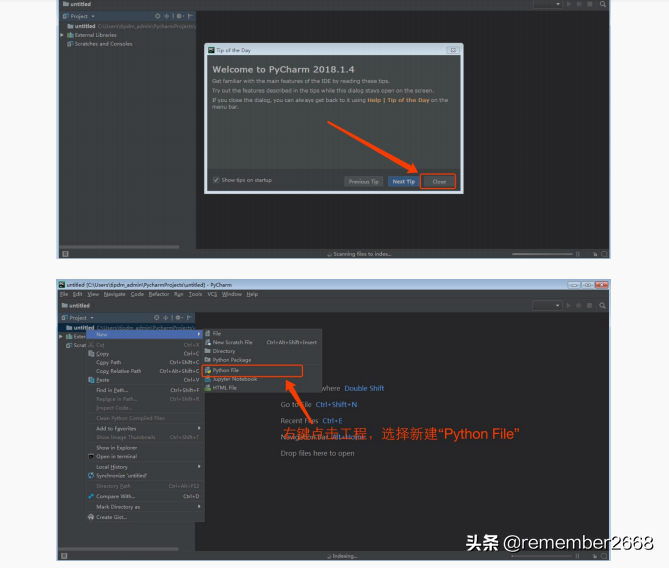
1. 启动PyCharm
PyCharm在初次启动时会有很多操作提示,我们可以直接忽略。


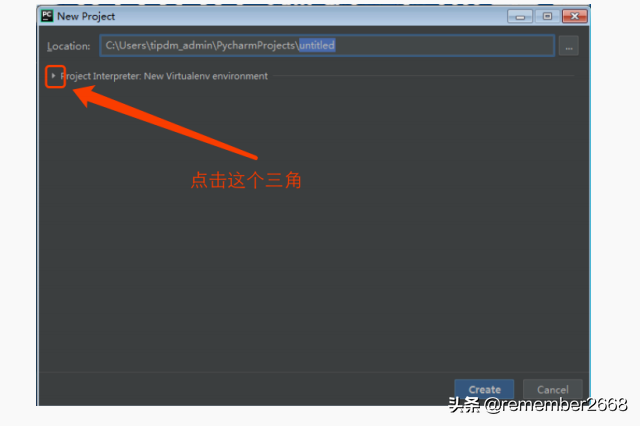
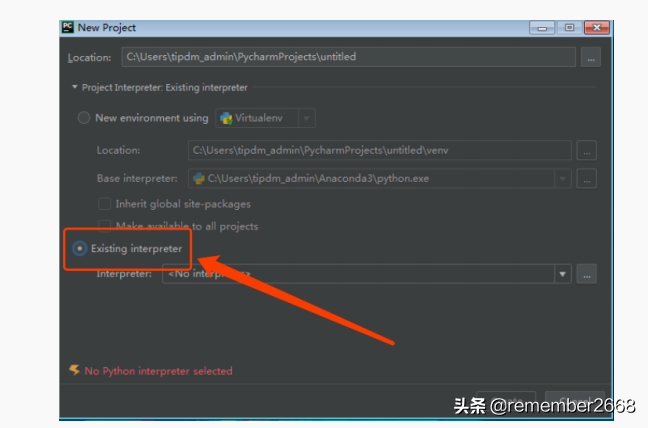
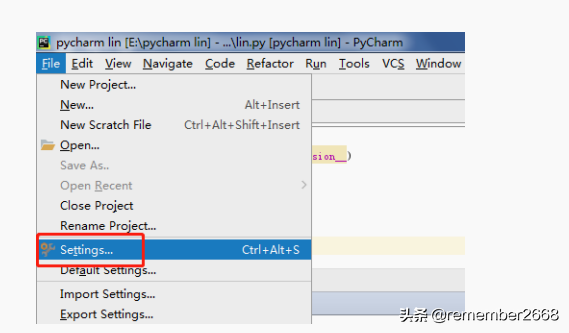
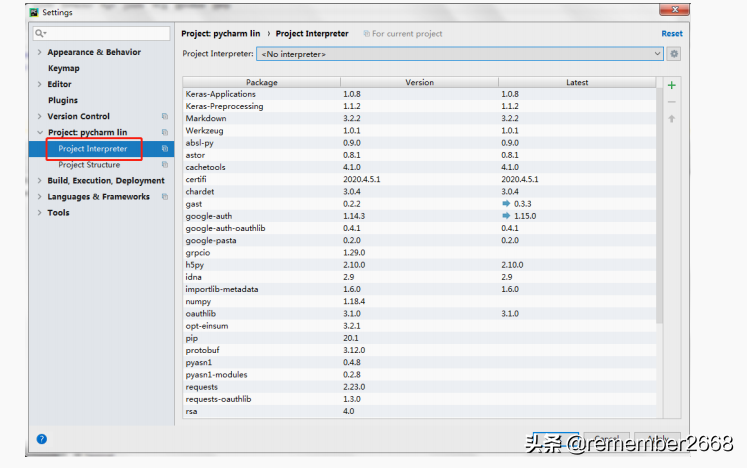
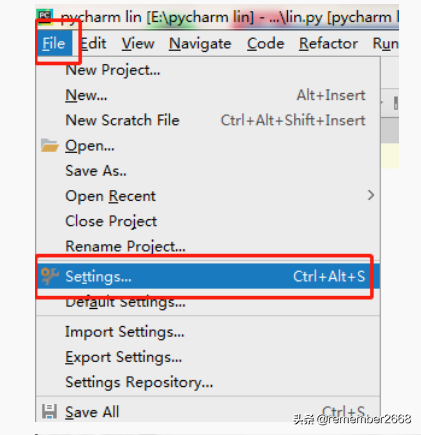
2. 利用PyCharm创建工程(Project)
PyCharm只是一个用来写代码的工具,想要执行Python代码需要将其与指定
的Python环境关联起来,在这一步我们需要将PyCharm与Anaconda中的Python环
境关联上,这样才能保证代码正常执行。
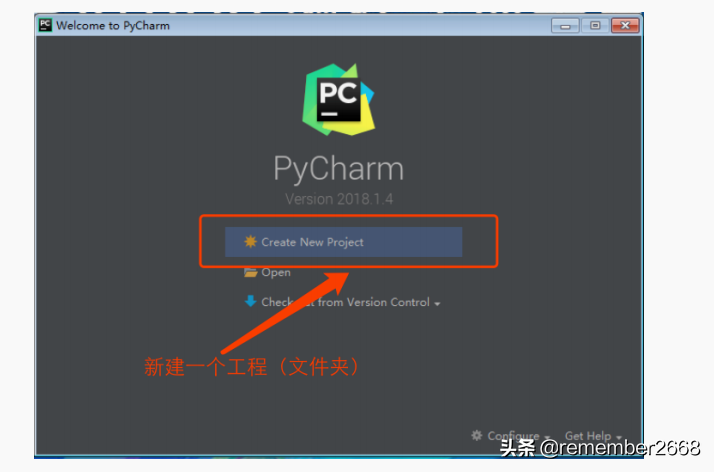
创建一个工程,一个工程(Project)其实就是一个文件夹,是在实际项目
开发中常用的一个概念,主要为完成一个具体任务而创建。
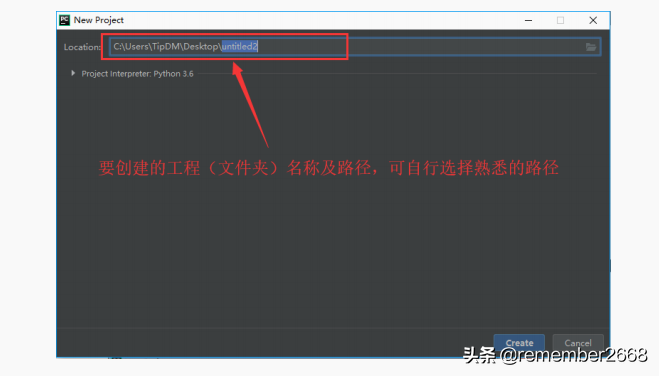
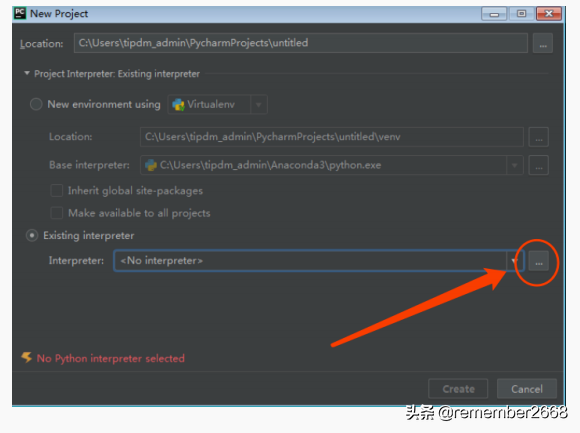
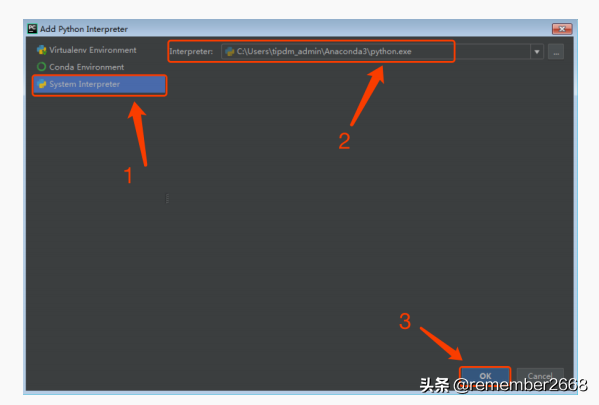
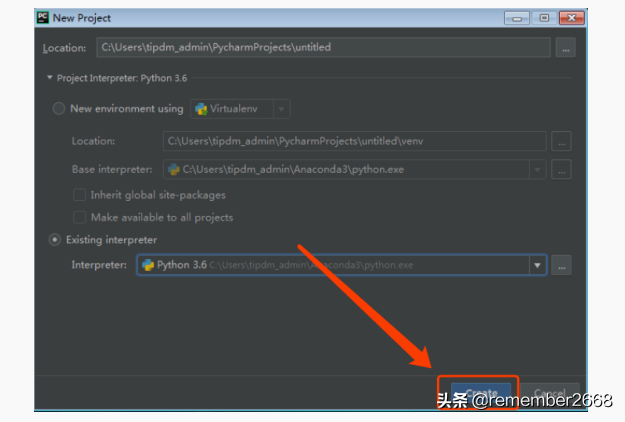
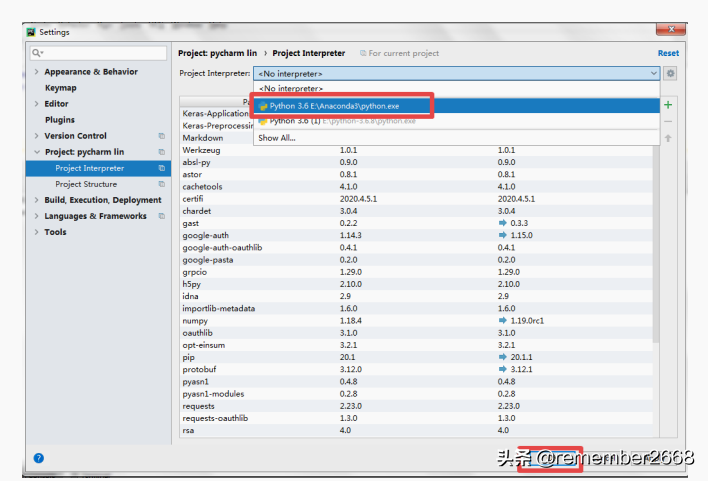
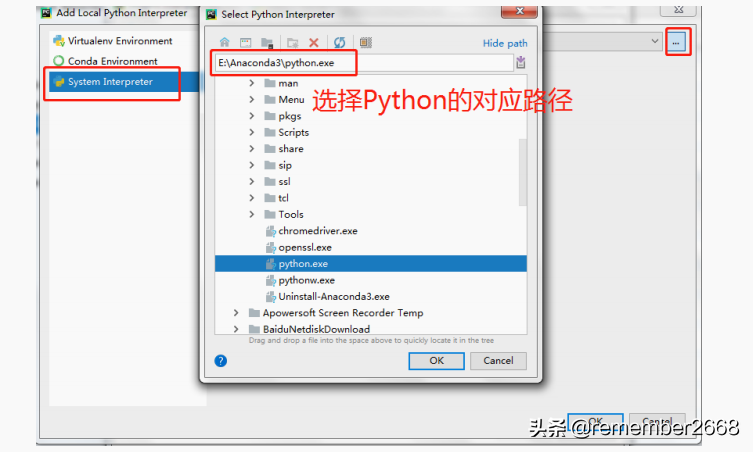
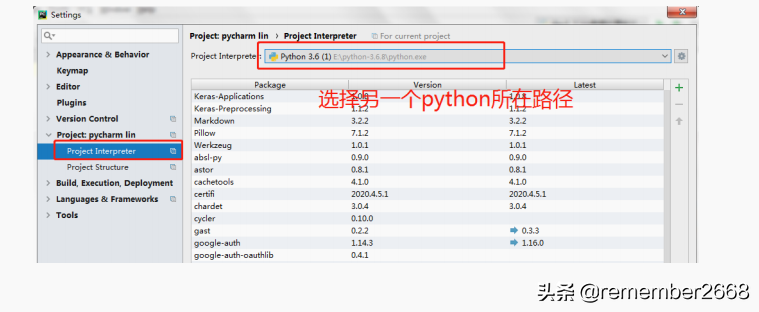
为创建的工程关联一个Python解释器(重要),此处我们选择Anaconda中集
成的Python.exe作为解释器。

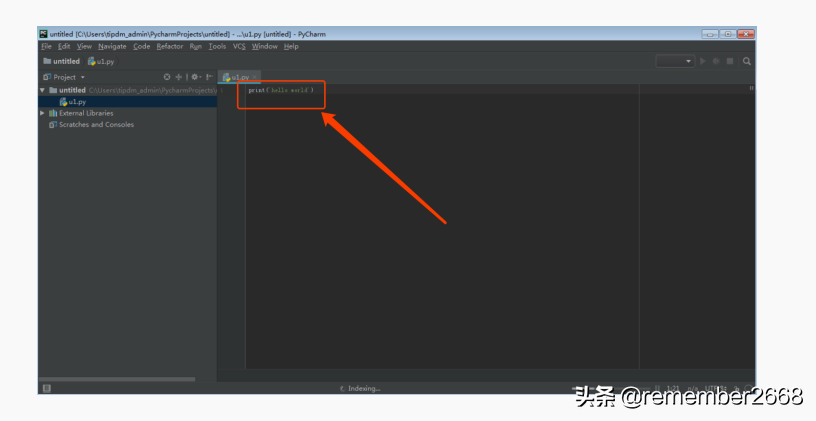
好啦,这样就可以用PyCharm进行Python开发工作啦!
五、Q&A
1.Anaconda常见问题
( 1 ) 安 装 时 , 出 现 " due to incompatibility with several Python
libraries,'Destination Folder' cannot contain non-ascii... "
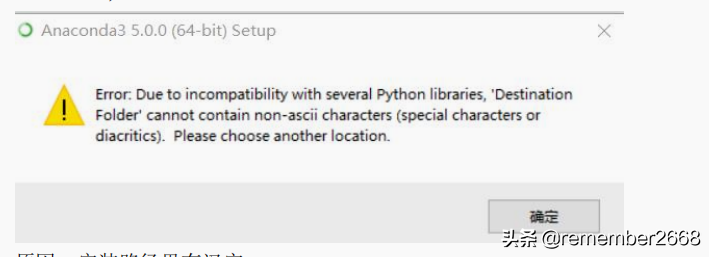
原因:安装路径里有汉字。
解决办法:把文件夹名为汉字的改成字母,或者直接安装一个没有汉字的路径里。
(2)安装时,出现"Failed to create menus"、"Due to incompatibility with
several Python libraries,... "、" Installer integrity check has
failed.Common causes include incomplete download and..."

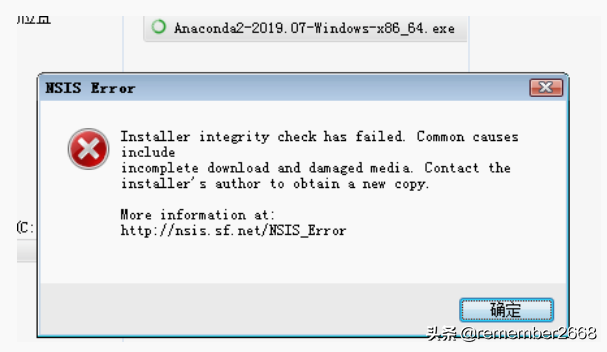
解决办法:重装 Anaconda,建议使用 Anaconda3-5.0.0版本。
(3)anaconda安装完成后只有 anaconda prompt

解决办法:重装 Anaconda,建议使用 Anaconda3-5.0.0版本。
(4)安装时,出现"Error:'Destination Folder' contains 1 space"
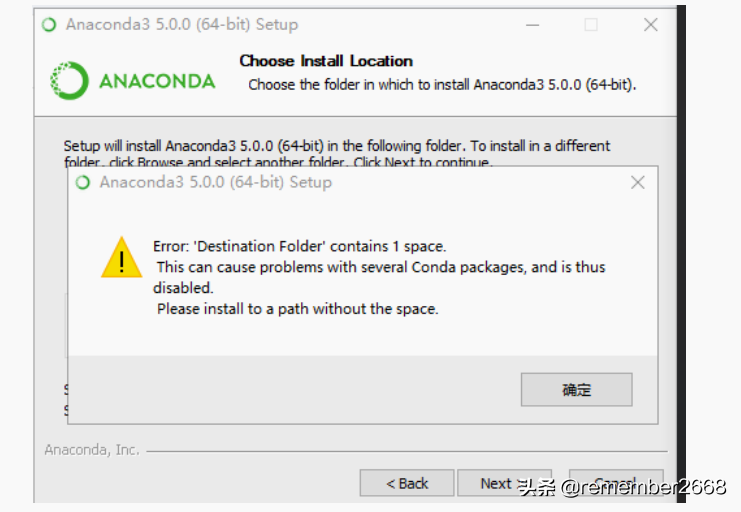
解决办法:检查安装路径是否正确,安装路径不允许存在空格。
(5)anaconda安装成功后仅可使用部分库
主要原因是由于 conda 环境中的 python 还未激活,需进入 cmd 处输入:conda
activate anaconda,对 python进行激活,之后输入 python进行检验。

(6)mac系统如何选择和安装 anaconda
选择 pkg安装包,安装教程参考博客:
https://blog.csdn.NET/qq_38105596/article/details/100926386?utm_mediu
m=distribute.pc_relevant.none-task-blog-BlogCommendFromMachineLearnPai2-1.nonecase&depth_1-utm_source=distribute.pc_relevant.none-task-blog-BlogCommendFromMachineLearnPai2-1.nonecase
(7)mac系统如何测试环境变量是否设置成功
使用命令:conda list
不提示"-bash: conda: command not found"则表环境变量设置成功。
(8)如何将 Anaconda下的 python更新到指定版本
参考博客:https://blog.csdn.net/qq_30262201/article/details/78813127
2.Pycharm常见问题
(1)启动时,显示"Failed to JVM DLL binserverjvm.dll..."
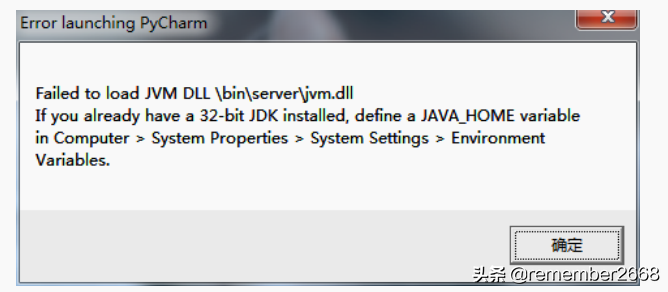
解决办法:
a.检查电脑是否安装 jdk,打开"打开命令提示符",查看 jdk版本。
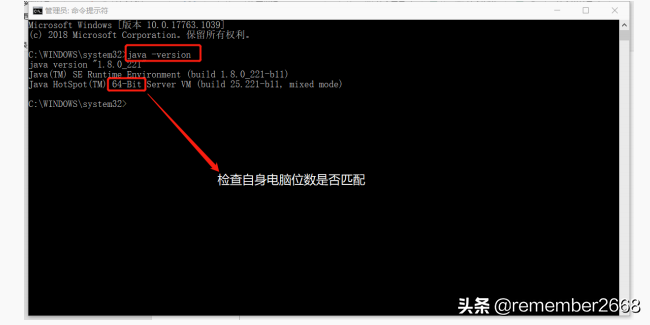
若显示命令报错,则未安装 jdk,前往https://www.oracle.com/JAVA/technologies/javase-jdk13-downloads.html下载相应的 jdk并安装。若发现 pycharm 安装版本与 jdk 不相匹配,则重新下载相应位数的 pycharm版本。
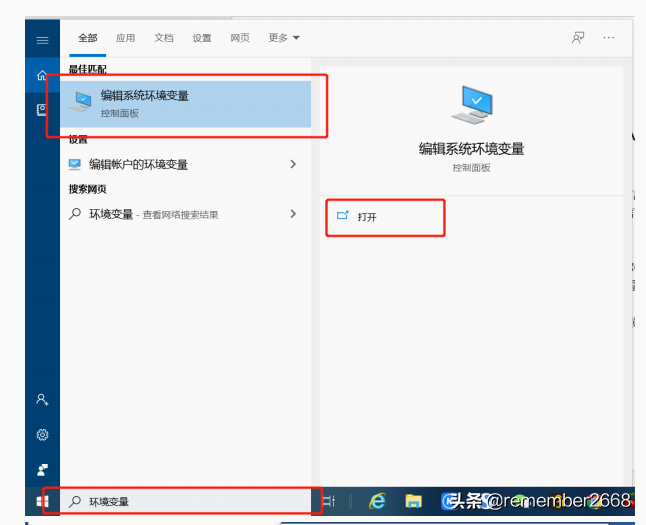
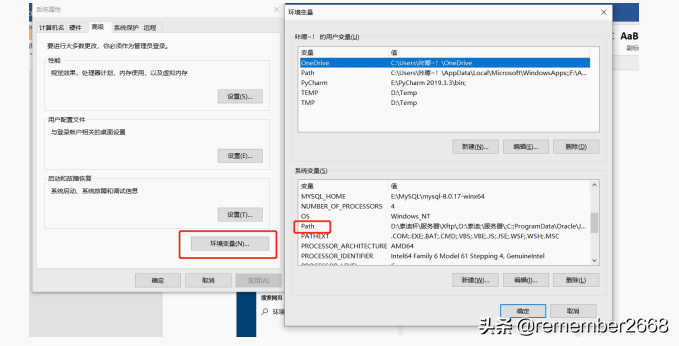
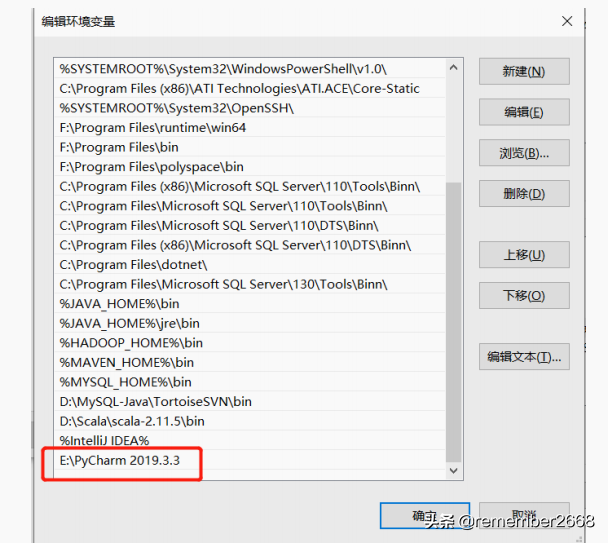
b.检查环境变量设置是否配置准确。
c.若以上还不能解决,则有可能未安装 Microsoft Visual C++ 2010
redistributable,需进行手动下载
32bit:http://www.microsoft.com/download/en/details.aspx?id=5555
64bit:http://www.microsoft.com/download/en/details.aspx?id=14632
(2)使用 Pycharm时未同 python进行关联,可能出现错误"Conda executable
path is empty"、"Please select a valid Python interpreter"...
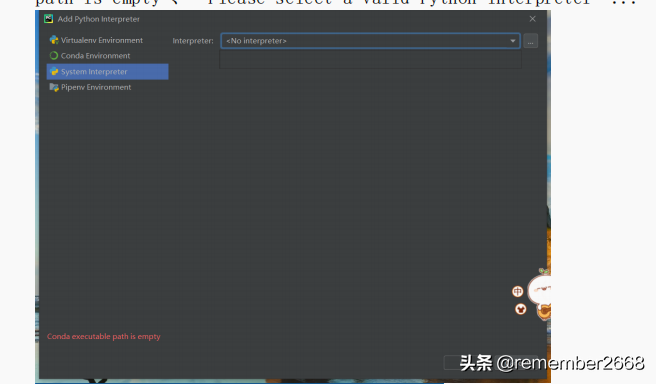
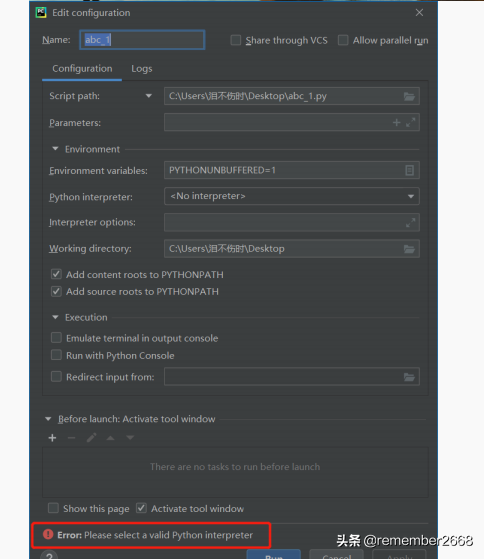
解决办法:关联 python环境。
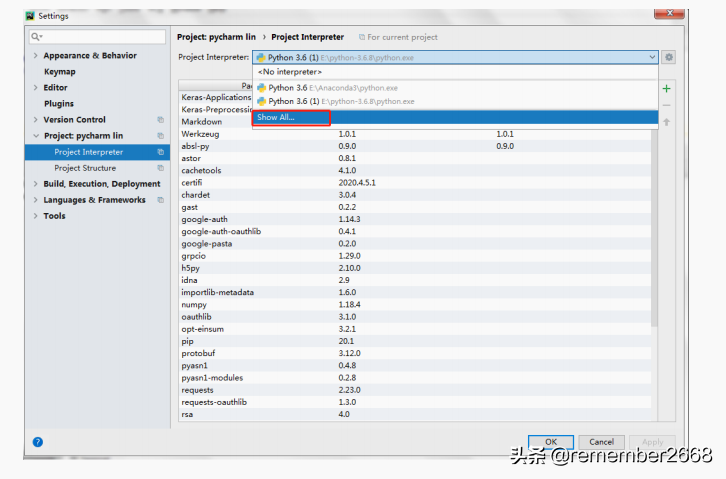
情况一:如果下拉列表有 python.exe 直接选中,然后按 ok。
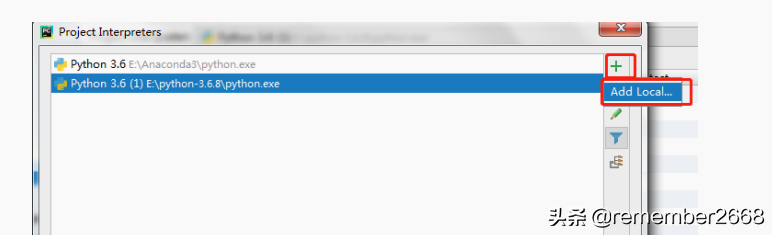
情况二:下拉列表没有解释器。
(3)使用时,出现警告信息"Windows Defender might be impacting your build
performance..."
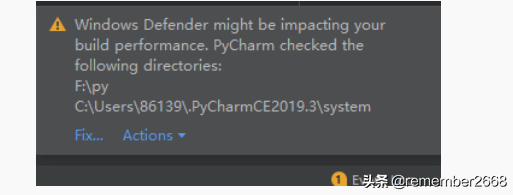
解决办法:
参考博客 https://blog.csdn.net/whatday/article/details/103611427
(4)Pycharm一直处于 processes running
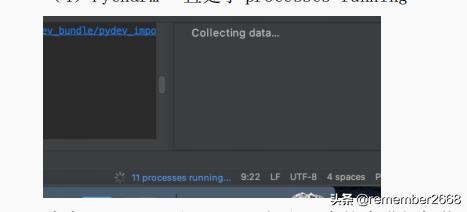
此为 pycharm 对 python 解释器中的库进行加载,若长时间还未结束,需重启
pycharm,抑或重启电脑。
(5)mac系统中,PyCharm 如何配置 Anaconda环境
参考博客:https://blog.csdn.net/Amberdreams/article/details/81227488
(6)Pycharm重新关联解释器
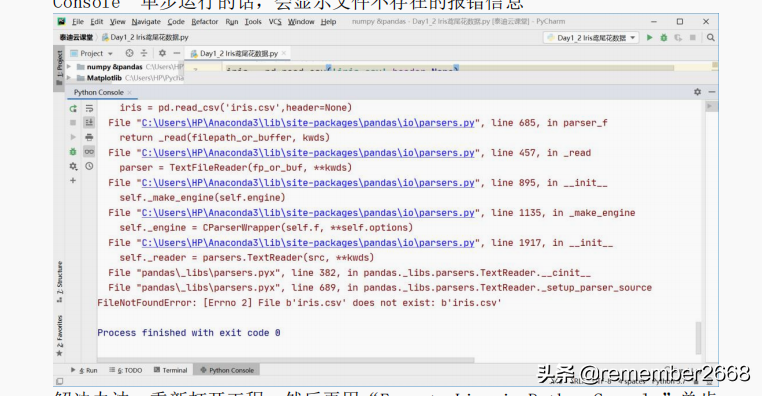
(7)Pycharm 中,整个文件运行后,之后要想用"Execute Line in Python Console"单步运行的话,会显示文件不存在的报错信息
解决办法:重新打开工程,然后再用"Execute Line in Python Console"单步运行
(8)Pycharm更改背景颜色
参考博客:
https://blog.csdn.net/weixin_42312791/article/details/80977874
3.jupyter常见问题
(1)进入编程页面出现空白页面
解决办法:重装 Anaconda,建议使用 Anaconda3-5.0.0版本。
(2)打开 jupyter没法自动跳转浏览器
解决办法:将谷歌浏览器或者搜狗浏览器设置为默认浏览器,推荐使用谷歌浏览
器。
(3)打开 jupyter浏览器跳出的页面需要密码
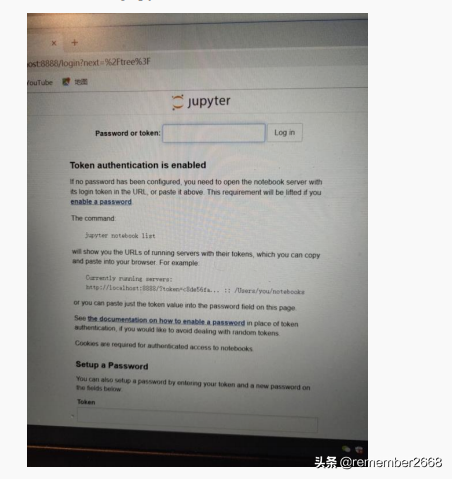
解决办法:参考博客
https://blog.csdn.net/weixin_43690620/article/details/85200543
(4)按 Tab键无法进行索引,且插件也无法进行安装
这种情况属于 anaconda安装过程中出现错误,需重新安装 anaconda。
(5)使用时,显示"jupyter_nbextensions_configurator server extension not
visible"报错信息
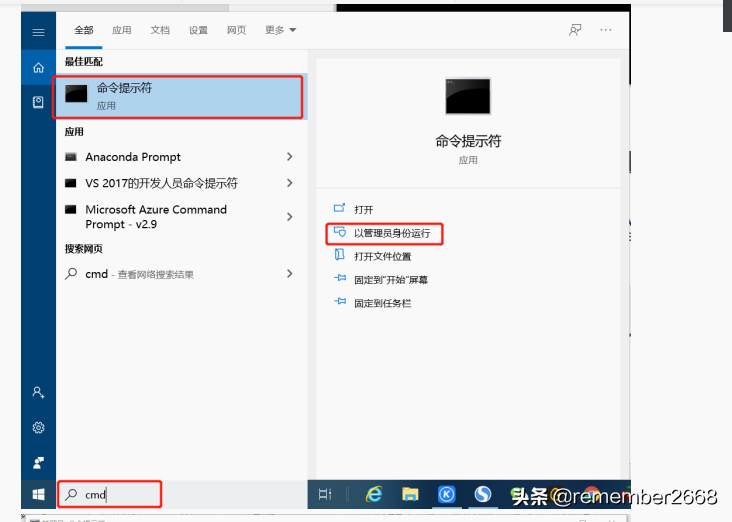
解决办法:
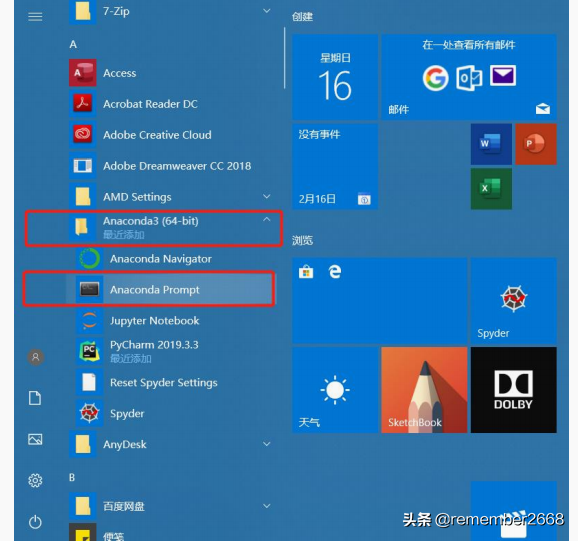
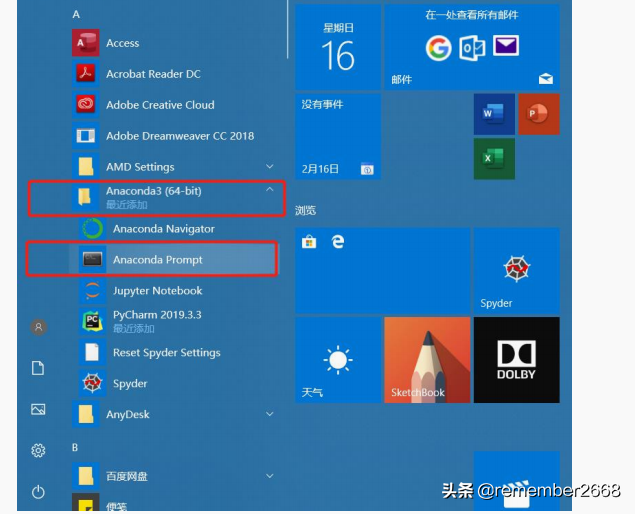
打开 Anaconda中的 Anaconda prompt(最好以管理员运行)
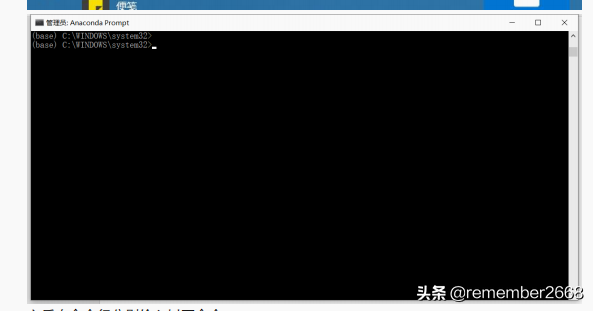
之后在命令行分别输入以下命令:


(base) C:WINDOWSsystem32>conda remove jupyter_
(base) C:WINDOWSsystem32>conda install -c conda-forge
(base) C:WINDOWSsystem32>conda install -c conda-forge
(6)用 jupyter绘图时无法显示
解决办法:
(a)重新运行一遍代码;
(b)重启 jupyter;
(c)如果上述方法还未解决,请更换浏览器,推荐谷歌浏览器。
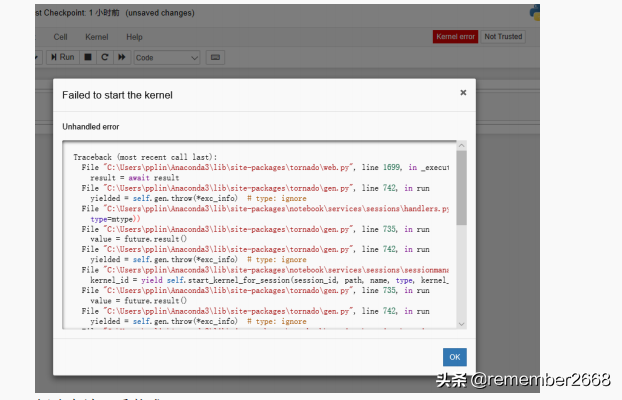
(7)jupyter创建不了 python文件,显示"Failed to start the kernel"
解决办法:重装成 anaconda3.5.0.0
(8)数据分析课程视频中老师使用 jupyter 敲代码时有代码提示
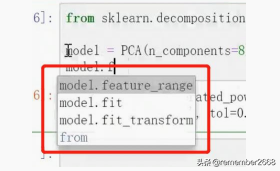
这个是安装了插件,若想安装,可参考网https://mp.weixin.qq.com/s/ipcV07BHWTIajx3LWfNWiw
若不想安装,可直接按 tab键索引就好。
4.库安装常见问题
(1)库安装完成时,显示黄色字体"You are using pip version..."

提示的是 pip可更新。若想更新,使用命令
python -m pip install --upgrade pip
(2)在 cmd终端下载库,显示"pip不是内部或外部命令..."

解决办法:
方法一:换成 anaconda prompt安装。
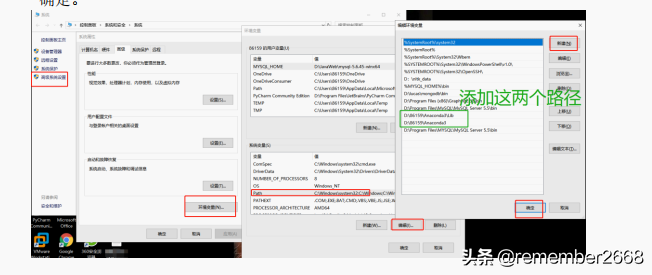
方法二:设置环境变量。控制面板-系统和安全-系统-高级系统设置-环境变量-选择"Path"-编辑-新建(添加 anaconda3 和 anaconda/ Lib两个目录对应路径)-确定。
(3)手动线下安装库时出现".whl is not a supported wheel on this platform."
解决办法:
进入 cmd输入 python,输入:
import pip._internal; print(pip._internal.pep425tags.get_supported())
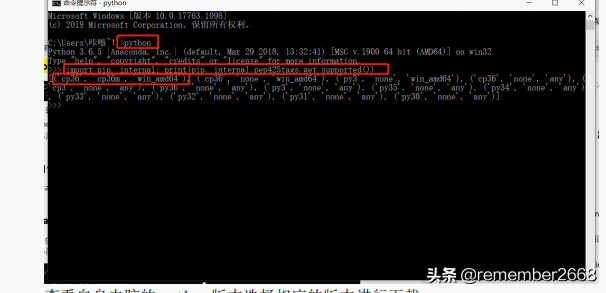
查看自身电脑的 python版本选择相应的版本进行下载。
下载地址:https://pypi.tuna.tsinghua.edu.cn/simple/
(4)如何更新库,或是修改库版本
更新库:
pip install --upgrade 库名 -i https://mirrors.aliyun.com/pypi/simple/
修改库版本:
pip install --upgrade 库 名 == 版 本 号 -i
https://mirrors.aliyun.com/pypi/simple/
(5)mac 系统中,python 环境配置是正确的,但仍显示"pip:command not found"
解决办法:安装 pip ,参考网址
https://jingyan.baidu.com/article/ca2d939d6299eaeb6c31cee2.html
( 6)安装库时 ,显示一堆 红色字体 的报错信息或者 是 " Retrying
(Retry(total=4,connect=None,redirect=None…"
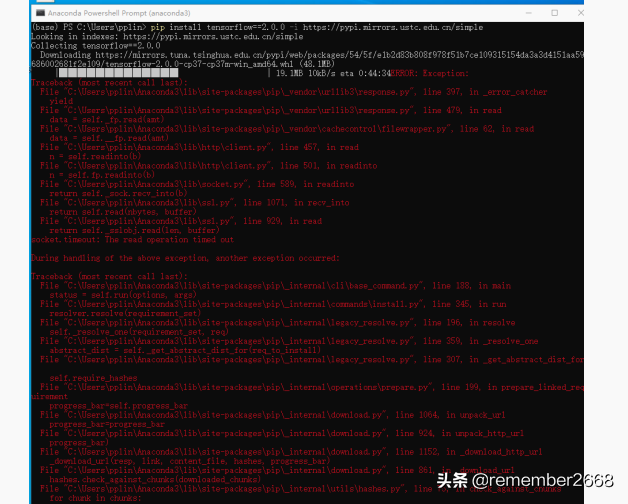
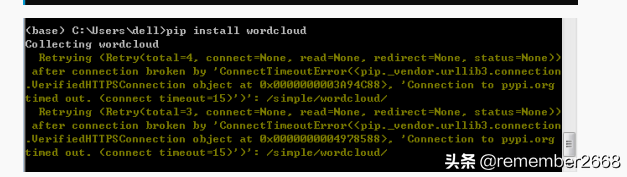
原因:这是因为网络问题导致的安装失败。
解决办法:命令可尝试多执行几次,如果还不行,可参考上述第六点"安装第三方法出现错误时的解决方法"。
(7)使用 pip 安装命令时,报错:Script file 'D:Anaconda3Scriptspip-script.py' is not present
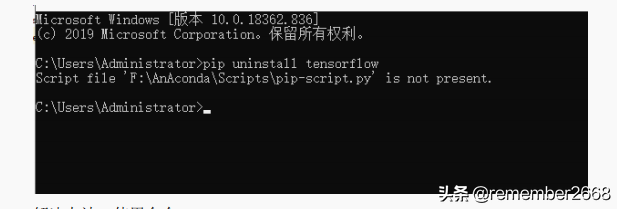
解决办法:使用命令
easy_install -i https://mirrors.aliyun.com/pypi/simple pip
5.库使用常见问题
(1)使用库时出现"ImportError:DLL load failed"报错信息
原因:当前所下载的版本太高或太低,导致版本不匹配问题。
解决办法:重装库。命令格式为
pip instal --upgrade 库 名 == 版 本 号 -i
https://mirrors.aliyun.com/pypi/simple/
如修改 pandas库版本命令如下:
pip instal --upgrade pandas == 0.23.4 -i
https://mirrors.aliyun.com/pypi/simple/
(2)使用 matplotlib库时,报错:this Application failed to start because it could not find or load the Qt platform...
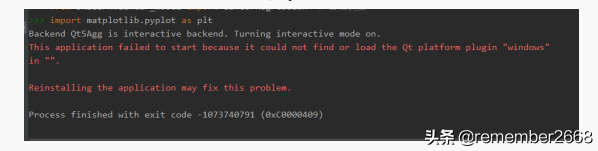
解决办法:重装 matplotlib
若还是未解决的话,参考网址
https://www.baidu.com/link?url=4z1hgi-AuM8CFgY1eIpswkjqxFdXcZA6tFJt0ScL8j3LHLV-Y3lQ8s2iuDfHntM2lD4i86ngyqc2E-QEskV9Z_&wd=&eqid=afcc57d70004f603000000065e795f9a
(3)用 pandas.read_Excel 读取 excel 文件时,报错:Missing optional dependency 'xlrd'.Install xlrd >= 1.0.0 for Excel support Use pip or conda to install xlrd
解决办法:安装 xlrd库,命令为:
pip install xlrd -i https://mirrors.aliyun.com/pypi/simple/
(4)使用库,特别是 sklearn 库时,报错:"No module named 'numpy.testing.decorators'"或者"No module named 'numpy.testing.noseteste'

解决办法:更换 numpy版本
pip install --upgrade numpy==1.17.3 -i
https://mirrors.aliyun.com/pypi/simple/
(5)安装时,显示"Consider using the '--user' option or check the permission"报错信息
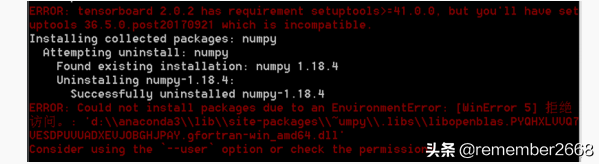
解决办法:在原始的安装命令中加上"--user",为 pip install --user 库名…
如安装的 numpy库,命令为
pip install --user --upgrade numpy==1.17.3 -i
https://mirrors.aliyun.com/pypi/simple/
(6)数据分析课程,使用 join合并数据,报错:ValueError:You are trying to merge on object and int64 columns.If you wish to proceed...
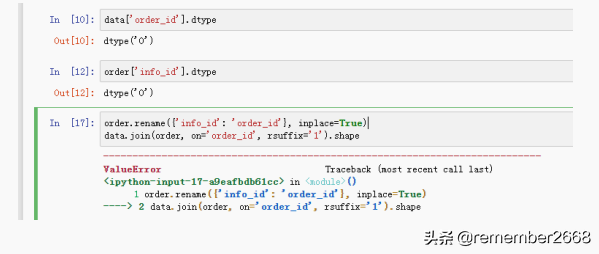
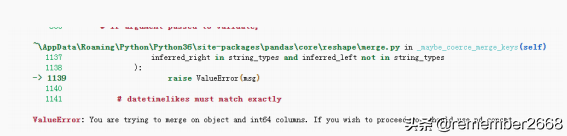
解决办法:更换 pandas版本
pip install --upgrade pandas==0.22.0 -i
https://mirrors.aliyun.com/pypi/simple/
6. 查看Python安装好的库
(1)查看当前库的版本
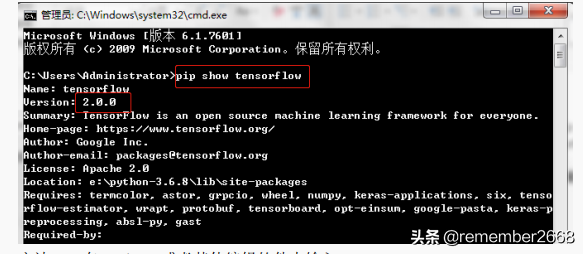
方法一:在 cmd中输入命令 "pip show packagename"命令,如查看 tensorflow
库你可以输入"pip show tensorflow"。
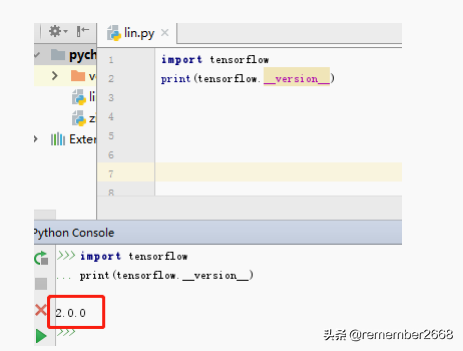
方法二:在 pycharm或者其他编辑软件中输入
import packagename
packagename.__version__
(注意"__"是由两个"_"组成的)
如查看 tensorflow库可输入命令:
import tensorflow
print(tensorflow.__version__)
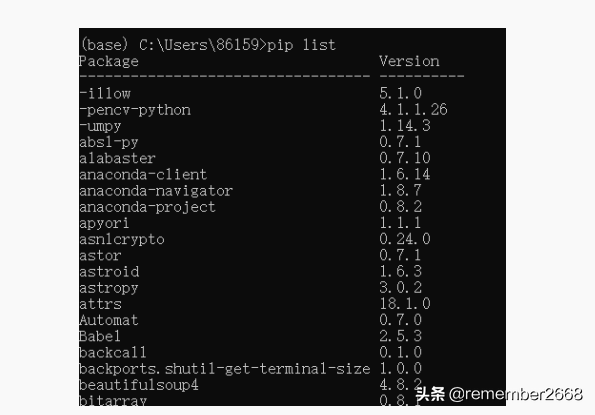
方法三:在 cmd中输入命令"pip list"(此方式可查看到当前 python环境所安
装的全部库)。
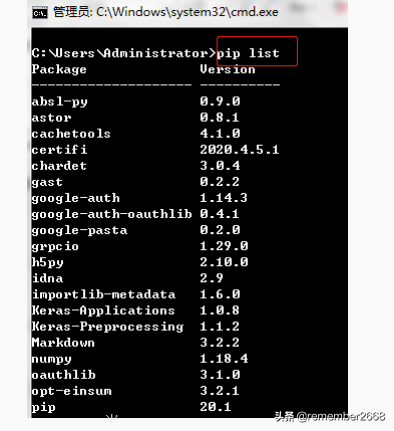
(2)查看 Python安装好的库
方法一:在 cmd输入:pip list
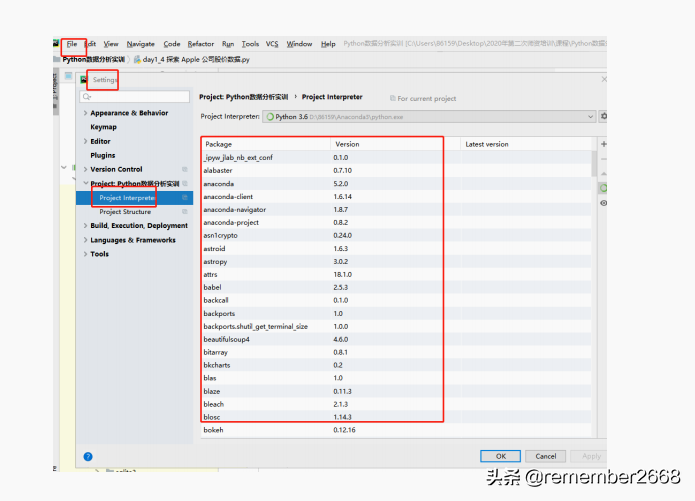
方法二:在 pycharm

方法三:在 pycahrm中
7.数据库常见问题
(1)pandas读取数据库文件
第一步:把 sql文件导入到一个数据库中;

第二步:engine 中的一些设置参考以下图进行更改,主要更改用户名、密码和数据库名称就可以。

(2)python创建 MySQL连接,读取数据库文件时出现拒绝连接情况
解决办法:
a.确认数据库服务是否开启(在 cmd终端输入 mysql查看是否启动 mysql,输入net start mysql 启动服务)。若开启则查看数据库端口是否被占用(默认端口为 3306)。
b.确认是否正确安装 mysql和 PyMySQL库。
c.关闭代理服务器。
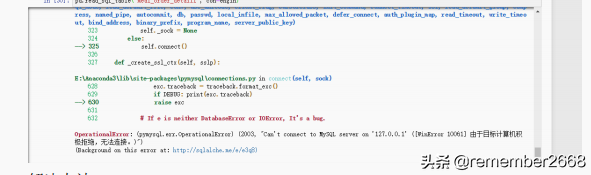
( 3)读取数据库数据时,报错:Can't connet to MySQL server on 'root'([Error 11001] getaddrinfailed)
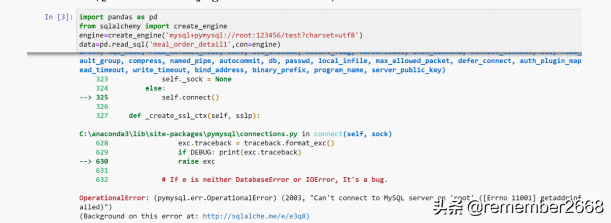
解决办法:engine设置不正确,需要设置地址端口
engine=create_engine('mysql+pymysql://root:123456@127.0.0.1:3306/test?charset=utf8')
( 4 ) 读 取 数 据 库 数 据 时 , 报 错 : OperationError:(pymysql.err.OperationalError) (1045,"Access denied for user 'root'@'localhost'(using password:YES)")
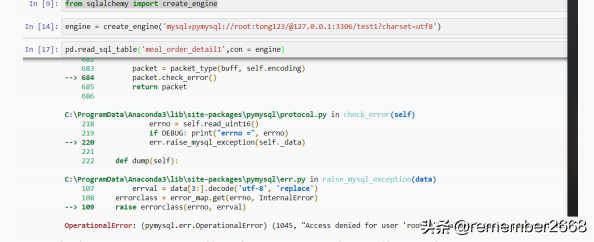
解决办法:engine设置的数据库密码不对,将密码修改正确。
(5)mysql数据库忘记密码
参考博客
https://www.cnblogs.com/ttxcs/p/11614391.html
8.运行安装包时显示权限不够"Your may not have the necessary to use all the features of the program..."
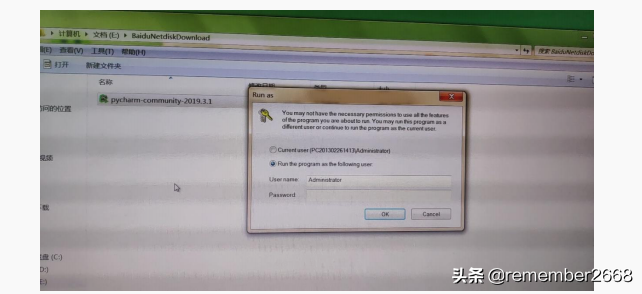
解决办法:右键安装文件,点击"以管理员身份运行"。
9.文件读取常见问题
(1)数据分析国民经济数据读取错误"Object arrays cannot be loaded when allow_pickle=False"
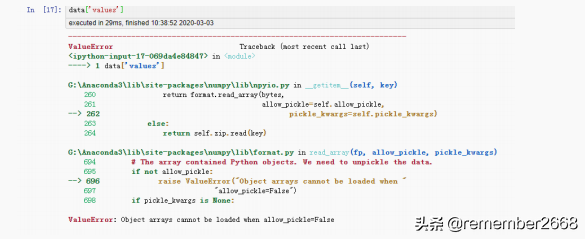
解决办法:在数据导入 np.load一行代码中设置参数 allow_pickle=True。有些版本的 numpy 参数 allow_pickle 默认值是 False,需要修改为 True,才能正确读取。
(2)读取文件时,报错:'utf-8' codec can't decode byte 0xd7…"
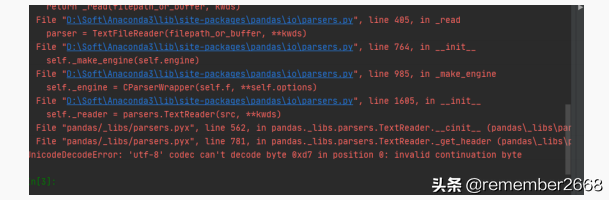
原因:文件格式不是默认的 utf-8。
解决办法:读取文件一行代码设置参数 encoding='gbk',如果还报 UnicodeDecodeError错误的话,以下编码格式一个一个试下。encoding 代表文件的编码格式,常用的编码有 utf-8、utf-16、gbk、gb2312、gb18030等。
(3)读取文件时,报错:OSError:Initializing from file failed
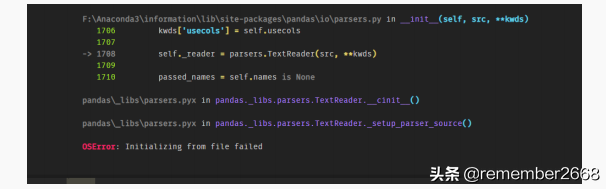
解决办法:读取文件一行代码设置参数 engine='python'
(4)读取文件时,报错:OSError:[Errno 22]Invalid argument:'…
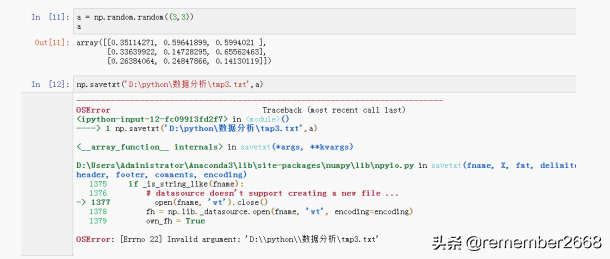
python中""为转义字符,路径中的""要防止被转义,所以需要改为"/"或
"\"或直接在路径前加 r。如图中的代码应改为
np.savetxt(r'D:python数据分析tmp3.txt',a)
10.代码问题
(1)Can only tuple-index with a MultiIndex
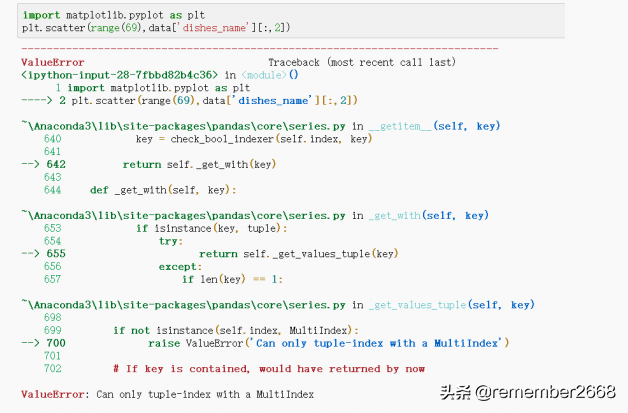
原因:data['dishes_name']是 Series,索引方式不对
(2)ValueError: Duplicated level name: "Date", assigned to level 1, is
already used for level 0.
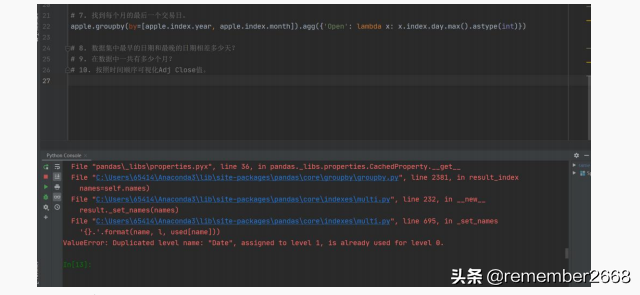
解决方法:
https://blog.csdn.net/DataFrame/article/details/84146498
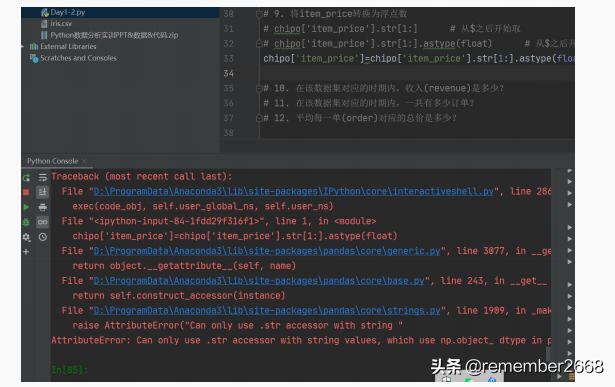
(3)Can only use .str accessor with string values...
原因:赋值后只能运行一次。